 Connect
Emyspot Website Builder Guide
Introduction
Emyspot is an easy to use website builder that lets you create a blog, store, or business website with ease. Emyspot has one free plan option and four paid plan options. You can also choose to start with a free plan and add on features of interest.

Figure 1: Emyspot plans.
The free plan comes with a subdomain of sitename.emyspot.com. You can access the site manager at any time, have no hosting traffic limit, and can have an unlimited number of webmasters. You get 250 MB of storage, up to two language versions of your site, and can personalise the 404 page on your site. You can create an unlimited number of pages, create a store with up to five products, and never owe emyspot any fees for products you sell using their web page. You can create an unlimited number of blog posts, an unlimited number of events, and can create reservations (without online payment). You can also create an unlimited number of contact forms, as well as forums, polls, quizzes, and a guestbook. You can enable voting for content, control comment spam, import items from WordPress, redirect old webpages using the 301/302 tool, display terms of sale/use, edit the footer, add CSS/JavaScript/META, and use interstitial to create a site introduction. You can add widgets, menu templates, determine the personalised site e-mail, create site members/sign up, create a newsletter with up to two newsletters per month, view daily basic visitor stats, configure Google analytics, and receive unlimited online support.
The plus version is $70 per year. You will remove host banners, ads, and the emyspot link, get up to 2.5GB of storage, up to 5 languages, and get detailed visitor statistics. You gain access to the PayPal widget, can password protect site content by page, can provide from the site, and can edit the site header. You can restrict site content based on membership, personalise your site sign-up form, manage/disable sign-up, enable membership chat, personalise presentation text, restrict comments or content to only members, and create user profile pages. You can choose forum moderators, create members-only forums, and allow only users to message in forums. You can allow users to propose blog posts, create a form to submit new events to the agenda, send up to 60 newsletters per month, and choose to import subscribers by group.
Store Pro is $200 a year. It allows you to display an unlimited number of products and photos per product online. It lets you sell downloadable files, and illustrate product combinations. You can suggest associated products, administer promo codes, create customer groups, and enable customer comments on products.
Booking Pro is $85 per year. This allows you to choose an unlimited number of booking locations and photos per location. It also allows online payment options for booking.
Finally, Domain Name Pro is $40 a year. It gives you a unique web address (like sitename.com), and up to ten personalised email addresses for your domain (me@sitename.com). You can instantly verify if the domain name is available and reserve it. Emyspot will set up and install the domain name. Your domain comes with up to 1GB of mail storage to split between your ten addresses. Once you’ve decided on a plan name, it’s time to get started.
Getting Started
Go to emyspot.com and choose to “Make a website”. First, you’ll be asked personal information like your name, email address, and to create a username and password. Next, you’ll be asked for website information. This includes website address, site name, language, and type. Next, you’ll be asked to choose a theme for your website. You can choose to search by primary colour, number of side menus (1 or 2), number of design settings (few, more, or many), and other features (quick cart access, header search engine, and header slide show. You can choose to look by themes of showroom, easy, so responsive, business, flat, smart, or all. When you hover over the theme, it will tell you its type (EMS or bootstrap), and allow you to preview or apply the theme. Preview shows you the name, primary colours, how responsive it is, the number of possible side menus, the ballpark number of design settings, and other features on this site. The arrows will let you cycle between different views of the website.
Once you choose to apply one, you’ll be able to choose from a variety of add-ons. These are: blog, photo album, contact, polls, agenda, guestbook, directory, quiz, video gallery, store, forum, booking, and restaurant. You can also choose to enable a newsletter subscription link, sharing features for social media, and the ability to undo membership accounts they created on your site.
Finally, you’ll be asked to personalise your home page. You can change the content after the site is created, via the site manager. Once you’re ready, choose “save and activate website” to get started.
General Page Management
From here, you can view basic information about your website. You can view your site manager, as well as view links that will allow you to share your new site via Facebook, Twitter, or Email. Below, it will display store information about your latest orders, orders and money made today, yesterday, and this month. You can also view this same information for your bookings. You can also view visitor statistics, comments (published, unpublished, and spam), as well as your personal private message inbox. You can choose to create a new message as well. Finally, your activity log tells you who has logged in recently. At the very end, a “get help” section allows you to access online support or the user forum, as well as guides, FAQs and tutorials.
File storage lets you manage the files you have uploaded to your account, as well as upload more files. At top, you can choose to either view images or files. The same file storage manager will be present for both.
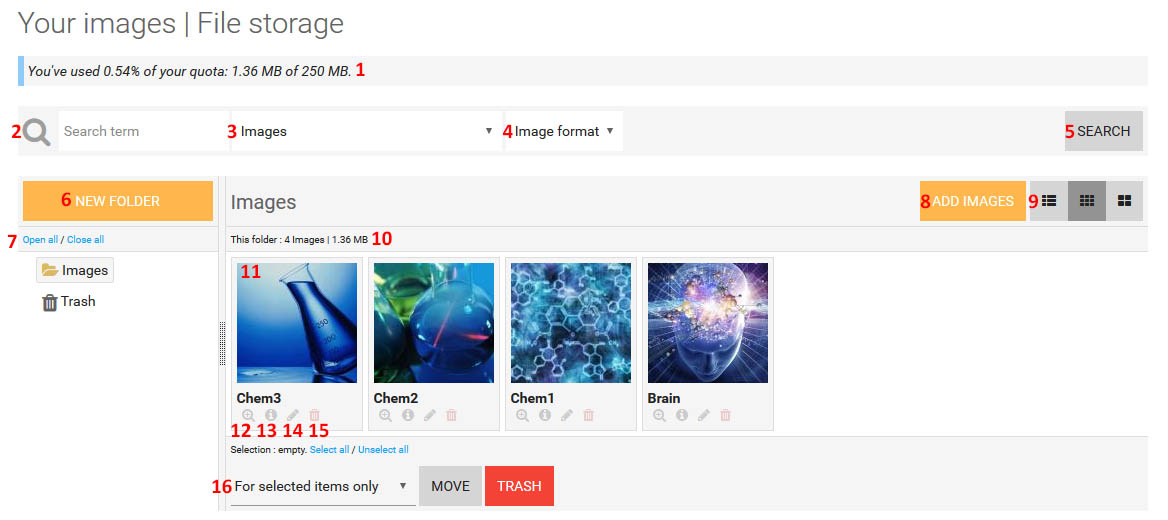
Figure 2: File Storage.
- View how much of your total storage space you’ve currently used.
- Search for a specific file.
- Choose the folder you want to search in.
- Choose to search for only gif, jpg, or png files.
- Submit your search query.
- Create a new folder for your files.
- Choose to open/close different folders to view the subfolders contained within. Click on a file to select and view images in that file.
- Upload a new image. You can choose to upload multiple files at once, or only upload a single file. You can choose what file the image(s) get placed in, as well.
- Choose a new display method for your images.
- View how much storage space is being used in the folder you currently have open.
- Click and drag to rearrange the order of files in your folder.
- Preview a close-up of the image.
- View file details (title, filename, URL, date added, width, height, file size, and file type). The “Insert” tab lets you know the various codes required to embed your image. The “edit” tab lets you change the title and folder of the image.
- Edit the title and folder of the image.
- Delete this image.
- Choose to move or trash items you have selected, or all items in this folder. You can also choose to select or unselect all images.
Settings
Design
From here, you can choose to change your website’s theme. Hovering over a theme allows you to preview, apply, or save a copy. You can also manage “my themes”. From here, you can personalise your theme and save them as one of “my themes” to use it at any point in the future. To modify your current theme, choose the “personalise” button. From here, you can choose to easy design, or expert design using CSS. It notes that only HTML experts should modify the CSS pages for your web page (this won’t be covered here).
General
Choose your background colour, opacity and image (if any). Choose the text colour and secondary text colour, their opacity, and their font. Choose link colour, opacity, and if links are underlined. Choose link rollover colour and opacity, as well as if they are underlined. Choose titles font, weight, colour, opacity, and shadow. Choose sub-title colour, opacity, and text shadow.
Primary Colour
This is the colour scheme used to highlight things on your site. These include things like price and button hovering. You can choose background and text color and opacity.
Components
These are elements in list format (photos, blog articles, and store items, for example). You can choose background and border color and opacity, as well as drop shadow.
Buttons
You can choose button text and background colour and opacity, border colour and opacity, and inner shadow.
Form Fields
Choose background, border, text, and default text colour and opacity.
Horizontal Menu
Choose position, choose if top menu is still visible when scrolling, choose menu height (normal or expand), choose to align content zone, choose to align menu links to left, right, or centred, choose to display search box, choose the height of the menu links (automatic, or height same as side menu height), and if the menu opens horizontally or vertically. Choose the background, bottom border, link background, link, link rollover, and link background colour upon rollover colour and opacity, as well as the drop shadow and text shadow. You can also choose background animation and vertical separator (if a border separates each link on the menu).
Sub Menu
Choose the background, border, link colour, link rollover colour, and link background colour on rollover colour and opacity, as well as the drop shadow.
Title and Logo
Choose the logo and title placement (horizontal menu, vertical menu, header, or hidden), as well as their location on a mobile phone. Choose the title size, and title size on phones. Choose the title colour, opacity, font, and text shadow.
Header
Choose the position (top centre, middle centre, or bottom centre), the colour (if any), and the image (if any). Choose if a parallax effect is present (as the page is scrolled, the background moves slower to give the page a sense of depth). Choose the header minimum height (1/3, 1/2, 2/3, or full), and choose if the header is hidden on mobile browsers.
Content Zone
Choose the background and border colour and opacity.
Side Menu
Choose to fix to vertical menu position. Choose the background and border colour and opacity. Choose to adjust the menu height. Choose if it is on the left or right. Choose its location on the mobile device (before or after the content zone, or hidden), choose if it is stuck to the content zone, and choose the separation border colour and opacity.
Widgets
Choose if an accordion effect is in place (opening one widget closes a currently open one). Choose the background, border, title, and title background colour and opacity.
Footer
Choose the background, text, link, and link rollover colour and opacity. Choose if the link upon rollover is underlined. Finally, choose the footer pattern where it cuts off from the main area of the page.
Blog
Choose whether or not posts are displayed in two columns.
Image Sizes
Choose how avatars are displayed (cropped or resized), and the avatar format size (length and height).
Menus
From here, you can view and modify your pages. You can either choose to modify one of your previous menu templates, or add a new one.
When you create a new menu, you can name it. Then, you can modify its properties. You can enable or disable your header and cart. You can edit the top menu. Here, the link names will be displayed, and arrows can be used to swap the order of the links. You can add a new link, edit the current links, or delete the links. Each link has a link type (internal, external, or anchor), a destination (for external, a URL, and for internal, a homepage, add-on, add-on category, or item in an add-on), a link title, if the link is opened in a new window, and who can view the link (If you have a plus version you can change this).
In the cart, you can choose the display mode (simple, with number of items and total, or detailed, with the list of products). You can also choose if the account sign out link is displayed on the shopping cart menu.
Finally, you have your side menu. You can choose to enable or disable this menu, as well as add a new widget to your side menu. You can drag to rearrange the menu items, as well as edit, hide, or delete that menu option. You can choose to display the title, pick a title, pick an image, and URL link. Each widget will have its own settings as well.
Widgets
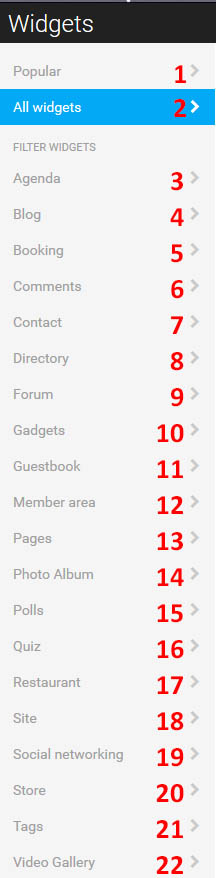
Figure 3: Widgets for side menus.
- Choose to view the most popular side menu widgets.
- Choose to view all widgets (covered below)
- Display upcoming events, categories of events, latest events, a search engine, an event countdown, an event, today’s events, or events by tag.
- Display links to your latest blog posts, categories, a search engine, authors list, or posts by tag.
- Choose rental categories, rental availability search engine, latest rentals, or search through rentals.
- Display the latest comments.
- Input a contact forms list, or a contact form search engine.
- Choose directory categories, latest sites, a search engine, a directory item, or a list of featured directory websites.
- Choose from forum category list, latest messages, or search engine.
- Choose to input an image slider, contact details, the current weather, a site translation, a search engine, Google maps, an MP3 player, an external RSS feed, an MP3 playlist, Agenda Cultural, GuestOnline, HTML, a visual editor, or Trip Advisor gadget.
- Display the latest guestbook messages.
- Choose member sign in, chat box, members online, or list of site members.
- Choose to show a simplified display of categories and pages, root page categories, latest pages added or updated, a page search engine, or a link to a page.
- Choose to display photo album categories, latest images, or a search engine.
- Display a poll, the latest polls, or a poll search engine.
- Display a quiz category list, the latest quizzes, or a quiz search engine.
- Display opening times, daily specials, set menus, menu item categories, menu items within a category, a search engine, or menu items by tag.
- Choose to display enabled add-ons, newsletter subscription option, site statistics, site search engine, visitor counter, site languages, or menu.
- Link to a Facebook page or profile, link to a Twitter profile, display social sharing links, show a Facebook page, show latest tweets, or display an Instagram.
- Display a product, cart, category list, best sellers, discounts, payment types, store search engine, products within a category, new products, products by tag, highest-rated products, most-commented products, manufacturers, and suppliers.
- Display a tag cloud.
- Display video categories, latest videos, highest rated videos, or a video search engine.
Global Settings
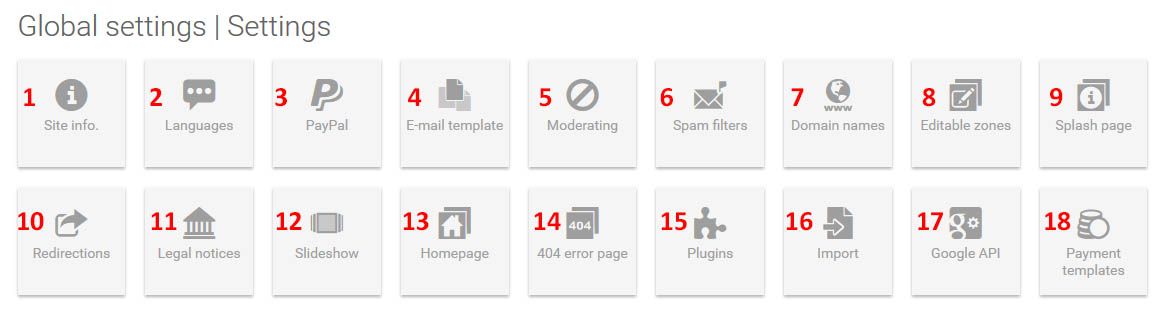
Figure 4: Global Settings options.
- Mange your site title, subtitle, date format (for posts), time zone, site email address (for sending out any site-related emails or receiving important site-related information), the email sender name, the site type, the logo, and the Favicon (appears next to your website name in the tab bar, or next to it in the favourite’s menu). You can also choose to disable access to your website.
- Add a language to your site, choose to enable it, and choose to delete it. It also displays up top the number of languages that are currently in use, and how many you still have available on this type of plan.
- If you have the plus version, you can use the PayPal widget to add PayPal products to your web page. You will need a PayPal account ID, the transaction type, and the currency.
- This lets you choose the default template for emails that are sent via your web page. You can choose the header content (logo and/or site title), the header background colour and text, the page background colour, the content background colour, and the border colour and width. You can choose the font, text colour, title colour, subtitle colour, link colour, and footer text colour. You can also choose to send a test message to your email account to preview how the newsletter will look. Below, a preview of how a potential e-mail will look is displayed.
- This lets you choose how message moderation will work. This is only for Guestbook comments, not Forum comments. Regardless of option, messages marked as spam will not automatically be displayed. Message moderating can occur before or after publication (before means your approval is required before the messages are posted).
- Choose how spam is filtered out. You can use no captcha, standard (if you have version plus), or ad-based captcha’s. You can also input an Akismet API key ($5 per month) to enable this service. Finally, you can use your own anti-spam filters to automatically mark as spam comments that contain blacklisted words, domains, or users from a certain IP address.
- Here, a list of your domain names are displayed. The principle domain name is your main site name. You can choose to redirect secondary names to your principle domain name. From here, you can choose to purchase and add a new domain name as well.
- This allows you to add content within your site that contains CSS, JavaScript, or META tags. This option is only available to version plus users, and should only be used by those very familiar with HTML.
- This appears once every 24 hours when a user visits a page of your choice. You can edit its appearance using the editor tools. You can choose the close window text, choose where it is displayed, and enable test mode (which displays the test page every time so you can view its appearance when testing your page).
- This lets you replace an existing URL with a different one without losing your place on the search engine results list. You can choose the scope (internal or external), the source URL, and the destination URL. Under advanced, you can choose if this is permanent (301) or temporary (302) as well as the expiration date for the 302. You can search for rules by the source URL, destination, scope (internal or external), type (301 or 302), order (predefined, date added, expiry date, or alphabetical order), and sort by ASC or DESC.
- This lets you publish important legal notices required by some countries. These include legal notices, terms of use, terms of sale, and privacy policy. Choosing to display this will display an editor where you can input your terms. Emyspot also offers a template document for you to use if you aren’t sure how these forms are supposed to look.
- This lets you choose how long each images is displayed for, the photo background colour, the text background colour, the text colour, the preview strip background colour, the height option (fixed or automatic), and the pixel size of the fixed height option. You can also choose if the preview strip is displayed.
- This lets you choose which add-on is your homepage’s content. It is Pages by default, but you can replace it. You cannot disable the homepage add-on unless you choose a new one. You can also choose the home page’s name in the site navigation.
- Choose the name of the 404 error page, as well as edit its content using the content editor.
- Edit various plugin settings here. For comments, you can enable or disable them, choose a service (default or Disquis), choose if smileys are displayed, choose the number of comments per page, choose the comment display order (oldest to newest or newest to oldest), choose to disallow new comments, and choose to restrict comments to members only (if you have version plus). For social networking, you can choose to enable sharing, choose the button style (icons, buttons with no counters, buttons with horizontal counters, or buttons with vertical counters), view a preview, and choose which services are in your share bar (Blogger, email, Facebook, Google+, LinkedIn, Mixi, Pinterest, Post, StumbleUpon, Tumblr, Twitter, and/or Viadeo). Ratings lets you enable them and choose to only allow members to rate (if you have version plus). Member access can restrict access to only members if you have member plus. Password access lets you enable password protection of your site if you have version plus. Menu template lets you choose which template you want to use for the menus on your site.
- This lets you import an existing WordPress site to emyspot. You can import the blog and/or pages, choose the default webmaster, create redirections for the old page, choose the category prefix, and choose the tag prefix. The file must be uploaded, which means you must export your WordPress page before you can import it.
- This lets you access certain Google services on your site. To learn how to get you API key, visit this tutorial: https://www.emyspot.com/pages/webmaster-tutorials/advanced-website-settings/enable-a-google-maps-api.html.
- This lets you create and edit payment templates for your store. You will choose a name and description. Then, you can choose the payment types you want to enable and what order they appear in. Payment options are credit card via PayPal, check, wire transfer, upon delivery, credit card via Paysite, money order, credit card via Paybox, credit card via Payplug, or bitcoin. Then, you can choose the name, description, surcharge amount, surcharge percentage, and any other specific information needed (for example, PayPal ID for credit card via PayPal). Later, in add-ons, you can then choose this payment template for services requiring payments.
Marketing
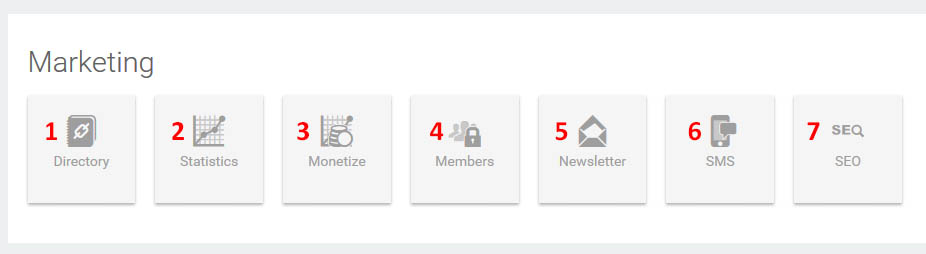
Figure 5: Marketing Options
- Choose how your site will appear in the emyspot directory. Choose the site title, description, keywords, category (news, art/culture, business/finance, computers/internet, games/hobbies, health/well-being, society, sports, and travel/tourism, as well as appropriate sub-categories), and a site avatar.
- View the number of visits over the current day, month, or year. You can also view the page views and page views/visit if you have version plus.
- Enable Google AdSense so you can profit from ads placed on your site. This option is only available for version plus members.
- Manage your members or add new ones. On the dashboard, you can view the latest subscriptions, member accounts, member events, and comments. You can also view statistics on enabled accounts, disabled accounts, groups, comments, comments waiting approval, and spam comments. The members tab allows you to view and create new members. To create a new member, you’ll need to input the username, password, email, name, and language. You can also view users by username, email, name, date added, groups, loyalty points, and status. You can edit or delete any of these members. Under edit, you can modify username, change password, redirect upon member sign-in, modify member information, member presentation (descriptions), and forum signature, as well as if the account is enabled. Under the groups tab, you can create new groups. You can also view the group name, added date, and membership, as well as edit or delete the group. The registration form tab lets you personalise the member registration form if you have a version plus membership. You can choose the default fields, as well as if help-text is presented. The default options are: username, e-mail, family name, given name, title, date of birth, website, about me, avatar, forum signature, newsletter subscription, phone number, pseudonym, and social networking. Below, you can add new fields. You can choose if these are displayed on member profile pages and/or the registration field, choose if the field is required for registration, and choose the field type (text, multi-line text, confirmation check box, single choice radio buttons, drop down menu, date field, or multiple choice checkboxes). If multiple choices are an option, you will be asked to provide those choices. The subscriptions tab lets you manage membership subscriptions so you can create pay for site content (only if you have a version plus membership). These include offers, orders, options, and payment types. Offers lets you create new subscription offers. A new subscription will ask you to choose a name, image, the price per chosen number of months, the description, and which subscription groups these members who subscribe will be added to. Orders lets you filter paid orders. You can choose by date, status (paid or awaiting payment), payment type, and member name. Options lets you choose to enable subscriptions, choose the currency for payment, and choose the introductory text. Payment types lets you add a payment template from those created earlier as a method for paying for a subscription on your site. The settings tab lets you modify the options. Options let you enable site member features and enable account deletion. You can choose a member area homepage, member registration text, and member area home page for connected members if you have version plus. You can choose to modify plugins associated with the members as well (comments, social networking, ratings, and menu). Registration lets you enable user registration, choose if they are automatically approved, and choose a default group to which new site members are added. Chatbox lets you enable a chatbox for site members if you have version plus. Member profiles lets you choose to display profiles on your site if you have version plus, as well as if members are redirected upon sign-in. Finally, you can import or export member lists using .csv files. Finally, the comments tab displays all members comments created on your site.
- Here, your newsletter subscribers are listed. You can add a new subscriber via email, or if you are a version plus member, you can import a .txt email list. Below, you can view a list of al subscribers, view the date added, see if they are a member, and view current status (confirmed or not). The newsletter tab lets you create new newsletters, as well as view old archived ones. It also tells you how many of your newsletters you have sent this month, and how many you still have left to send. When creating a newsletter, you can choose the newsletter subject, the sender’s email address, the content with the content editor, the action (queue for publication, save as draft, schedule publication date, or send a test), and who is getting the newsletter (if you have version plus). Finally, the options tab lets you choose the presentation text for your newsletter (a typical format for how the newsletter is usually displayed).
- This displays all users who have listed a phone number, whom you can choose to send out SMS text messages to. The SMS campaigns add lets you choose to create a new SMS message that will be sent out to these members. You can choose the champagne name, recipients, sender, and message content. You will need SMS credits to send out these messages, and one will be deducted for each member targeted by the champagne. The options tab lets you choose to enable SMS features, if you have version plus.
- SEO lets you manage your search engine optimisation so that users can more easily find your website using search engines like Google. txt has rules that allow search engines to index all site pages for your auto-generated sitemap. You can choose to disable the automatic file, but this is only recommended for experts. Sitemap is an XML file with all the URLs of your various site pages. Again, you can disable the automatic sitemap file, but it is also only recommended for experts. Google search console is a special analytics tool that can help your website be more easily located. You will need to obtain an HTML tab from your own Google Search Console account to use this feature. Finally, Bing webmaster tools is a similar analytical tool but for the search engine Bing.
Pages
Add a New Page
When you create a new page, it will ask you to come up with a page title (which will appear at the top of the page), title to be displayed in the menu, an illustrative image to represent this page’s content, a category of the page (as well as the ability to create a new category), a “category alias” to create a shortcut from other categories, and the page’s status (draft or published). Below these options you can then start to fill in the content of your new page using the content editor, which has been discussed in previous sections that allow you to add content to various parts of your page. Your page can be divided into content sections, called blocks, and each block can be subdivided into columns. You can also add a page break in between blocks to separate them more thoroughly.
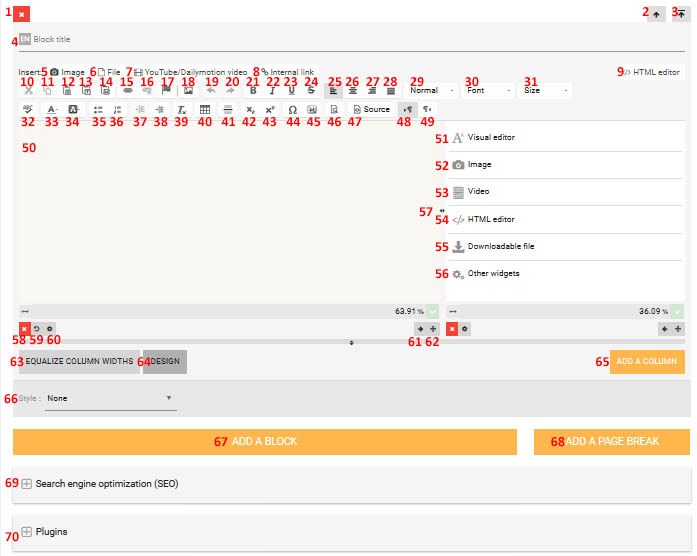
Figure 6: Page content editor.
- Remove this block.
- Move block up one section (if block is on top, you will be able to move it down one section).
- Move block all the way to the top (or all the way to the bottom, depending on block location).
- Insert block title here.
- Insert an image into your block. It will open up “your images”.
- Insert a file into your block. It will open up “your files”.
- Insert a YouTube or Dailymotion video. Clicking on this button will open a popup for you to search for your video of interest using keyword or URL.
- Insert a link to one of the pages on your site. You can add a link for the homepage, home page of an add-on, an add-on category, and an item in an add-on.
- Open up the HTML editor instead of the visual editor.
- Cut text (remove and save it to clipboard).
- Copy text (keep it in the block and save it to clipboard).
- Paste from clipboard.
- Paste from clipboard as plain text.
- Paste from Microsoft Word.
- Insert a link. You can choose URL, anchor, or email. You can also choose to set a target (like a new window, the same window, or a popup window), or you can use advanced link options.
- Unlink a previously created link.
- Create an anchor element, which can later be used to automatically scroll the user down to that item on the page using a link.
- Insert an image using a URL. You can set the alt text, width, height, border, horizontal/vertical space, alignment, URL the image links to, and advanced image properties.
- Undo last change.
- Redo last change.
- Bold
- Italicizes
- Underline
- Strikethrough
- Align left.
- Align center.
- Align right.
- Justify text.
- Choose the text formatting (normal, or a variety of header numbers (a smaller heading number is a larger text).
- Choose the font of the text.
- Choose the size of the text.
- Spellcheck your current entry.
- Change the text color.
- Change the text background color.
- Insert/remove a bulleted list.
- Insert/remove a numbered list.
- Decrease indent by one tabbed space.
- Increase indent by one tabbed space.
- Remove formatting from text.
- Insert a table. You will be asked to choose the number of rows and columns, the width and height, the header location (row and/or column), the cell spacing and padding, the border size, the alignment, the caption, and the summary. You can also change the advanced table options.
- Insert a horizontal line.
- Insert a subscript.
- Insert a superscript.
- Insert a special character.
- Insert a non-breaking space.
- Preview your post.
- View the source code for this post.
- Have text direction be left to right.
- Have text direction be right to left.
- Type the content for your page here.
- When inserting a new column, these are your possible options for what you would like that column to consist of. The first is a visual editor, identical to the one above.
- You can also make your new column an image.
- You can make your new column a video.
- You can open the HTML editor to modify this column.
- Make your new column a downloadable file.
- Make your new column a different widget (same as the ones discussed earlier for the side menu options).
- Use this arrow to drag to determine how much space each column on either side of the arrows takes up.
- Delete this column.
- Reset this column.
- Choose a column style. The options are: highlighted column, highlighted column on hover, leaderboard column, bordered, muted column, or personalised.
- Swap the column with the one to the right (if the column is on the right, it will have a left arrow to swap to the left).
- Drag the column where you want to move it.
- Make the columns equal widths.
- Open the design options for this block.
- Add a new column.
- Change the design for this block. The options are: separated columns, separated block, highlighted columns, highlighted block, highlighted columns on hover, highlighted block on hover, leaderboard, muted block, or personalised.
- Add a new block.
- Add a page break.
- Manage the search engine optimisation for this page. You can choose how the search engine displays its title, keywords, description, and URL. You can also determine the Meta tags and remove this page from the sitemap if you have version plus.
- Edit the settings for different enabled add-ons. These are: comments, ratings, social networking, “new” content labels, member access, password access, and menu template. You can choose to enable or disable these various components here.
Dashboard
Here, you can view various statistics about your pages. You can view the number of published and unpublished pages, categories, comments, comments awaiting approval, and comments classified as spam. You can view the latest comments, the add-on recent activity, and the newest pages. You can also use the plus sign to create a new page.
Pages
Manage your pages here.
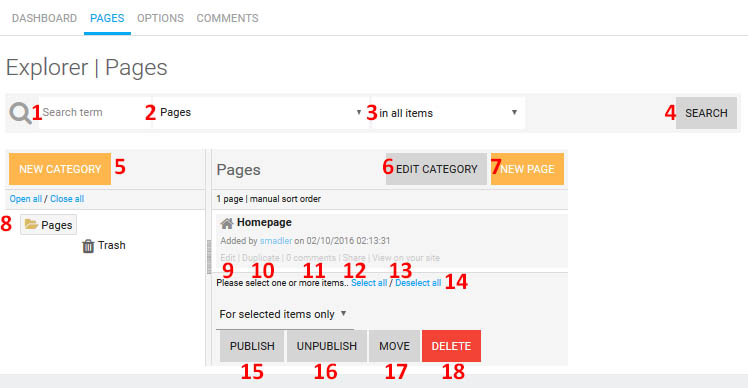
Figure 7: Manage your pages.
- Search for a certain page.
- Choose what folder you want to search in.
- Choose to search through all, published, or unpublished items.
- Submit your search query.
- Create a new page category. Choose a category title, if you want to hide the category, the display order for category items, and if you want a side menu link for this category.
- Edit the current category.
- Create a new page.
- View your different categories and the pages contained within them (which will then be displayed at right).
- Edit this page.
- Create a copy of this page.
- View comments on this page.
- Share this page via social media.
- View a live version of this page.
- Select or deselect all pages.
- Publish this page to your site.
- Un-publish this page from your site.
- Move this page’s location.
- Delete this page.
Options
From here, you can change the “Pages” title, choose an image for the “Pages” add-on, and whether or not display page update and illustrative images. You can modify the SEO settings (the same options as you have for individual pages). Finally, you can manage your plugins from here as well.
Comments
Manage the comments from your various pages. You can choose to display all, published, unpublished, or spam comments.
Add-Ons
On the add-ons page, you can choose to manage or disable add-ons by hovering over the add-on logo.
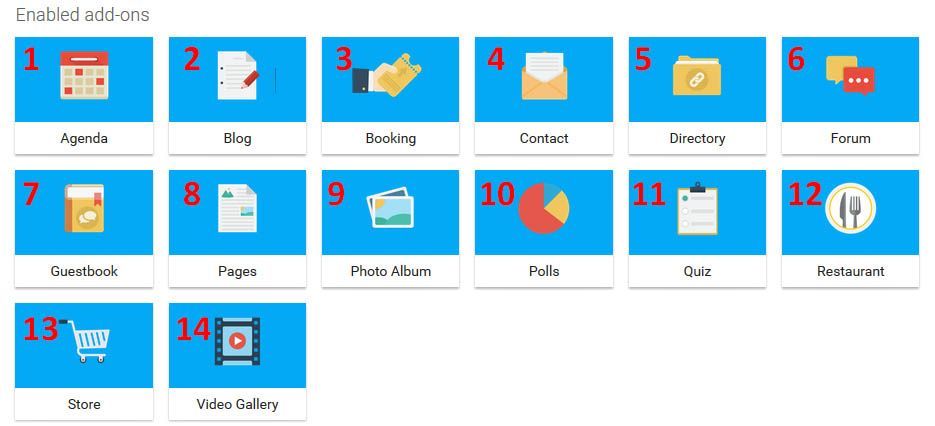
Figure 8: Add-on menu.
Agenda (1)
Create an agenda of events to display for your website visitors.
Agenda Dashboard
This tab tells you the number of published and unpublished events, as well as the categories. You can also view latest activity and events, and use the plus sign to create a new event.
Agenda Events
Here, you can view and edit all events in your agenda. You can also create new events and event categories.
For each event, you can list a start title, an image, a category, tags, and a category alias. You can choose a start date (and if it is multiple dates), as well as a start and end time, and if an event repeats. You can choose the venue, address, and if it will be displayed on a map. You can choose the duration, cost, website, contact, ticket URL, and ticket URL link label. You can use the content editor to create an event description. You can add optional content in a new block at the end of your event page with additional blocks and columns for more complete content. You can choose if the status is published or unpublished. If you have version plus, you can enable membership participant lists for this event. Finally, you can modify the SEO and plugins for this event.
Agenda Options
These let you choose the add-on title, image, introductory text (using the content editor for the index page for the add-on), and whether or not event archiving is enabled. You can choose the number of events per page, the display type on the home page (calendar and/or list), the type in categories (calendar and/or list), and event submissions by members (if you have version plus). You can also edit the SEO and comments for this add-on.
Agenda Import
If you are a version plus member, you can import events here.
Agenda Export
If you are a version plus member, you can export events here.
Agenda Tags
This lets you manage tags for the agenda. You can delete, edit, or merge tags here, but cannot create new tags from this location.
Blog (2)
Add a blog to your site.
Blog Dashboard
Here, you can view statistics on the number of published, unpublished, and scheduled posts, as well as the number of categories. You can view an activity log, the latest posts, and create a new post using the plus sign.
Blog Posts
Here, you can view and edit all events in your agenda. You can also create new blog posts and post categories.
Each post has a post title, illustrative image, category, category alias, and tags. Then, you can use the content editor to create blog post content. There is also the option to create a split post (more content separated from teaser content if you want the post to be in a new page), with columns and blocks. You can also set the publication status as published or unpublished, an expiration date for the post, the SEO, and the plugin options.
Blog Options
Here, you can choose the add-on title, image, and the introductory text. You can choose the number of posts to display per page, if a Google+ profile link is below the blog post, and the number of related posts. You can choose the number of related posts to display, if the illustrative images are in the item lists, if the illustrative image are on item pages, and (if you have version plus) you can enable blog post submissions for members. Finally, you can modify the SEO and the plugins.
Blog Tags
This lets you manage tags for your blog. You can delete, edit, or merge tags here, but cannot create new tags from this location.
Booking (3)
Use this to rent out items, locations, or services.
Booking Dashboard
View statistics on the bookings and money profited from said bookings today, yesterday, and this month. You can also view the number of published and unpublished items, as well as categories. Finally, view the add-on activity log and latest rentals. You can also create a new booking with the plus sign.
Booking Rentals
Use this to manage current categories and rentals, as well as create new categories and rentals.
Each rental has a details, images, periods, and extras section. In details, you can choose a title, illustrative image, category, category alias, status (published or unpublished), description, and reference number. There is also a detailed description section for the item. You can use “other content” to create blocks and columns of very detailed description about your rental. You can choose the number of simultaneous bookings allowed (for example, if this rental has three identical units, it would be three allowed at once). You can set the booking mode (per day, per week, or per time slot), the type (per day or per night), the minimum number of days/nights, the days of the week the booking is open, and the day of the week your calendar week starts on for calendar display. You can choose the base price, how long the bookings are available for, the display type, if unavailable timeslots are shown on the calendar, if the number of places are available on the calendar, and any additional rental conditions. You can also display the maximum occupancy, the area, and the equipment available on site. Finally, you can manage the address, SEO, and plugins. Under images, you can “add an image” from “your images” to be associated with that rental. Under Periods, you can define different prices for the rental for different times of the year and define blackout dates. Each period wants a name, start date, end date, and price adjustment percentage or monetary value added or subtracted). Finally, under extras you can offer additional features for your rental. You can choose a name for the extra, and then give this extra multiple attributes. For example, you can choose a name of “bed sizes” and then give each attribute “single, queen, or king” with an additional price per night.
Bookings
View and search your booking list. You can use a calendar to view bookings, or search through them. You can search by rental option, date booking was made, date booking was paid, booking status (confirmed or paid), client name, and order number.
You can also create new bookings from here. First, you’ll need to choose a rental. Then, you’ll need to choose a date. You can set a quantity, price, and the amount received. You can also calculate the price based upon the cost per night times the number of nights. You can set the payment as paid or confirmed. You can also set the client’s name and surname, address, phone, email, and comments. The same options are available for those bookings already made if you need to edit them.
Bookings Settings
Here, you can manage your options, preferences, or payment types.
In options, you can manage the add-on title, illustrative image, introductory text, SEO, and plugins.
In preferences, you can choose the booking type (rental property/equipment, appointments, or tickets), manage orders (choose if payment is disabled, requires a deposit, or requires paid in full), if detailed client information is required for booking, if email alerts are enabled for new bookings, and the deposit percentage. Payment handling is only available for bookingPRO members. You can display the number of items per page, choose if the rental search engine is on the Booking homepage, if the illustrative image is on item lists, and if the illustrative image is on item pages. Finally, you can use the content editor to manage the confirmation message on the booking confirmation page, choose the default currency, and choose if the currency symbol is before or after the price.
Finally, in payment types, you can choose from a previously created payment template to utilize for your booking payment options.
Contact (4)
Publish a contact form on your site for visitors to reach out to you.
Contact Dashboard
Here, you can view statistics on the number of published and unpublished forms, as well as the number of categories. You can view an activity log, the latest forms, and create a new form using the plus sign.
Contact Forms
Use this to manage current categories and forms, as well as create new categories and forms.
Each form can have a title, illustrative image, and short description. It takes introductory text, and allows you to choose its status (published or unpublished). You can choose form fields. The default fields are name, e-mail, subject, and message. You can also change the field name, choose if this field is required, and add help text to describe what that part of the field is for. You can remove forms and add new field types. You can add one-line text fields, multi-line, multiple choice checkboxes, single choice radio buttons, drop-down menu choices, a date field, or a file upload button. You can also add separate sections to your form. You can choose if the form is sent via private message or e-mail, the recipient members of the site for the contact form, the SEO, and the plugin options.
Contact Options
You can change the add-on title, illustrative image, introductory text, if illustrative images are displayed in item lists and/or pages, the SEO, and the plugins options.
Directory (5)
Create a website directory.
Directory Dashboard
This lets you view statistics on published and unpublished sites, as well as categories. You can also view the add-on activity log and latest sites, as well as create a new directory entry with the plus sign.
Directory Websites
Here, you can manage current sites and categories, as well as create new ones.
For adding a new site, you’ll input the URL, title, illustrative image, a short description, keywords, category, category alias, detailed site description, and other content using the “add a block” feature. You can import the site’s title, description, and keywords from Meta tags associated with that URL. You can choose the publication status (published or unpublished), and when the directory stops publishing. Finally, you can choose to enable or disable a featured site option, manage the SEO, and manage plugins.
Directory Orders
This lets you manage orders, which can only be done with version plus members. You can search by date, status, payment type, or member.
Directory Settings
From here, you can manage options, import or export directories, manage preferences, and manage payment type. Options lets you choose an add-on title, illustrative image, introductory text, number of sites per page, if there is a separate presentation page (each site is on its own separate page), if item lists and/or pages have the illustrative image, if latest websites are on the homepage, if a link click counter is active (for version plus members), who can submit websites (all visitors, disabled, site members, or a group of members), the SEO, and the plugin options. Import and export let you perform these options by using/creating a CSV. Preferences allows you to enable paid site submissions (if you have version plus). Finally, payment types lets you choose a template to accept these paid site submissions (for version plus members).
Directory Tags
This lets you manage tags for your directory. You can delete, edit, or merge tags here, but cannot create new tags from this location.
Directory: Check Site Links
This lets you verify website links regularly to detect and remove broken links.
Forum (6)
Create a forum where you can exchange views.
Forum Dashboard
This lets you view the number of published and unpublished forum threads, as well as the number of categories. You can also view the latest treats.
Forum Threads
This lets you view current threads, as well as create and edit categories. Threads can only be created in the forum add-on itself.
Forum Options
Here, you can manage the add-on title, introductory text, disable smilies (version plus), restrict posting to members (version plus), forum moderating (version plus), choose the number of items per page, and whether or not illustrative images are shown in item lists/pages. Finally, you can manage the SEO and plugin options.
Guestbook (7)
Let visitors lead messages and site feedback.
Guestbook Messages
You can view and manage all messages in your guestbook.
Guestbook Options
You can manage the add-on title, choose an illustrative image, write introductory text, choose the number of items per page, enable smilies, manage the SEO, and manage the plugins.
Pages (8)
Create new pages to publish content on your site. This has the same options as the “pages” menu covered above.
Photo album (9)
Display images and slideshows.
Photo Album Dashboard
This lets you view the number of published vs unpublished images, as well as the number of categories. You can view the add-on activity log and the latest images. Finally, you can use the plus sign to add a new image.
Photo Album Images
Here, you can create or edit categories, as well as add or manage images.
New images will request that you upload an image, choose a category, give it a title, and give it a description. You can rearrange the order of your images once you added them to your photo album.
Photo Album Options
From here, you can choose an add-on title, an illustrative image, introductory text, if the illustrative image is displayed in item lists, the SEO settings, and the plugin settings.
Polls (10)
Create poll questions on your web page.
Polls Dashboard
From here, you can view statistics on the number of published and unpublished polls and categories. You can also view the add-on activity and the latest polls. You can create a new poll with the plus sign in the top right corner.
Polls
Here, you can view and edit categories and polls, as well as create new polls and categories.
A new poll asks you to input introductory text, an illustrative image, and the poll itself. You will input a question, a description of what that question is asking if you so choose, and a variety of choices for that question. You can only ask one question per poll, and can delete your choices at any time. You can determine the status (published or unpublished), schedule an end date, and manage the SEO and plugin options.
Polls Options
From here, you can choose an add-on title, an illustrative image, introductory text, the number of items per page, if an illustrative image is in the items lists/pages, the SEO settings, and the plugin settings.
Quiz (11)
Create quizzes for visitor engagement.
Quiz Dashboard
From here, you can view statistics on the number of published and unpublished quizzes and categories. You can also view the add-on activity and the latest quizzes. You can create a new quiz with the plus sign in the top right corner.
Quizzes
Here, you can view and edit categories and quizzes, as well as create new quizzes and categories.
A new quiz asks you to input a title, an illustrative image, the introductory text to the quiz, the category, and the status (published or unpublished). You can then create your quiz. Quiz questions can have a question, an image, and several responses. The correct response is labeled “correct response”, but you can have as many choices as you want. You can create multiple questions with the “add a new question” button. There are arrows with each question that allow you to swap their position, and a red x that allows you to delete the question. You can then choose the result text for the quiz. You can choose what each range of percentages gives as a text output (for each 20 percent segment). Finally, you can manage the quiz’s SEO and plugins.
Quiz Options
From here, you can choose an add-on title, an illustrative image, introductory text, the number of items per page, if an illustrative image is in the items lists/pages, the SEO settings, and the plugin settings.
Restaurant (12)
Display a menu, contact detail, and more about your restaurant information. After a fifteen day trial period, you will need to purchase a restaurant pro subscription to continue using this add-on.
Restaurant Dashboard
From here, you can view the number of published and published items, as well as item categories and the number of set menus. You can view the add-on activity log, the latest items, and the latest set menus. You can also view daily specials for today and tomorrow.
Restaurant Items
This lets you view and edit categories and items in this add-on, as well as create new ones.
A new item asks for a title, illustrative image, category, price, status (published or unpublished), if it is displayed on the menu, a description, and tags. You can input a longer description below, as well as choose to add this item to the daily specials. Finally, you can determine the SEO and the plugin settings for this item.
Restaurant Set Menus
This lets you view and edit set menus, as well as create new ones. You can choose a menu title, price, status (published or unpublished), illustrative image, short description, and detailed description. You can add items and categories that you have previously created to this set menu, as well as manage the SEO for the set menu.
Restaurant Settings
From here, you can manage your options, preferences, and closed periods.
Options lets you choose an add-on title, an illustrative image, manage the SEO, and manage the plugins.
Preferences lets you choose if the restaurant is published, the number of items per page, where the pagination is displayed, and if illustrative images are shown in item lists/pages. You can set the default currency, the number of decimals, the decimal separator (space, dot, comma, or apostrophe), and the thousands separator, as well as if the currency symbol is before or after the price. You can choose the restaurant name, email address, address, and phone number. Below, you can choose the menu items page title, the URL for these pages, and the Meta description and tags, as well as if it’s on the site map. You can also choose this information for the set menu page. Below, you can choose the opening times for each day using the “new timeslot” option and then choosing the opening times.
Closed periods let you choose days and periods of time where the restaurant is closed. You can set the name for the closed period, as well as the start and end date.
Restaurant Tags
This lets you manage tags for the restaurant add-on. You can delete, edit, or merge tags here, but cannot create new tags from this location.
Store (13)
Create an online store and manage products, shipping, and billing.
Store Dashboard
Here, you can view the number of orders and the price made today, yesterday, and this month, as well as the latest orders. You can also view the number of published and unpublished products, the number of categories, the add-on activity log, and the latest products. Selecting the plus sign in the top corner allows you to create a new product.
Store Products
Here, you can view and edit products and categories. You can also create new ones.
A new product lets you choose a title, illustrative image, category, category alias, supplier, manufacturer, status (published or unpublished), short description, condition, and tags. Below, you can input a more in-depth description, as well as additional content blocks. You can add the price with tax, the ecotax, the applicable tax rate, the price without tax, the purchase price, and the weight. You can choose the quantity in stock, how out of stock purchasing works (allowed or denied), and the number of sales (which calculates the best-selling products). You can choose a discount for reduced price, the discount amount in dollars or percent, the final price, when the discount is available, and if an on-sale icon is used. You can input reference ID for order slips and invoices, supplier reference number, and GTIN code (barcode). Finally, you can manage the SEO and plugins for this product.
Once you’ve selected this information, you are free to upload images under the “image” button to provide visual information about your product. You can add an image from “your images”. Under the “combinations” button, you can create variants of this product. You can add a new attribute, the impact on price excluding or including tax, the impact on weight, the stock number, the reference number, the supplier reference number, the purchase price, and if this variant is enabled. You can also upload images for this specific variant. The “cross-selling” button lets you link another product to this one so that it is suggested when the first product is purchased. Using “link a product”, select all the products you have created that you wish to cross-sell. The “file” button lets you upload a digital product that customers can download after purchase. Finally, the “custom fields” button lets you choose to enable custom fields, and whether you wish to show it in the same or a new page. You can add fields for one-line text, multi-line text, confirmation checkbox, a single choice radio button, a drop-down menu, or a file upload.
Store Orders
This lets you view orders that have been made. You can filter by date, status (awaiting payment or payment received), payment type, status (awaiting processing, being processed, being restocked, shipped, cancelled by merchant, cancelled by customer, or personalised status), and customer name. You can also export orders, or export itemised orders.
Store Marketing
Discount Codes
These are coupons that customers can apply when ordering to achieve a reduced sales price. Each discount code allows a name, start and end date, maximum times it can be used, discount amount or percent, the products this code applies to, if free shipping or gift wrapping is offered with this code, and the minimum order amount (if any). This is only available for StorePRO users.
Privileges
This lets you enable discounts for purchases by customers in a certain membership group. You can choose a discount amount, percentage, and time frame. This is only available for StorePRO users.
Customers
This lets you view the site member accounts of customers who have ordered items on your website.
Stocks
This lets you view the store products and how many are in stock. Stock number is automatically reduced each time a payment is validated. You can choose to only display items with a stock at or below a specific quantity.
Google Shopping
This lets you submit your products to Google Shopping for price comparison so that people can find them more easily. You can only export items with a StorePRO account.
Statistics
This lets you filter your sales statistics by date range, and choose if you want to display sales, order number, incomplete order number, average spent, average number of products, and sales margin.
Loyalty Points
This lets you reward clients loyalty points who are repeated business shoppers. Once credited, they can be used as partial or full payment in the future. This feature is only available for StorePRO users. You can choose to enable the point system, enable use for redemption, name of loyalty points and how they are earned (fixed points per product, variable points per purchase, or fixed points per purchase). Variable points per purchase asks you the amount of points earned per so many dollar spent, and how many points are earned when that dollar amount is spent. For fixed points per purchase, you can choose the minimum purchase required to earn points, and how many points are then earned. Then, you can decide if points are displayed on product pages, the currency value of each point, if the currency value of points is displayed (on site order & account, and/or on cart & order pages), the number of points that are given to new accounts, what products can earn points, and which groups of customers can earn points.
Store Settings
Options
From here, you can choose an add-on title, an illustrative image, SEO settings, and plugin settings.
Preferences
From here, you can publish the store, enable sales, choose the minimum order amount, allow customers to add additional information, who can make purchases, if purchases are restricted to a certain group, and if e-mail alerts are enabled for orders. You can choose if gift-wrapping is an option, the price, and its tax. You can choose the default product tax rate, the price display (tax inclusive and/or exclusive), if out of stock purchasing is enabled, if display quantities are enabled, choose the last stock number, and if e-mail alerts are on for low stock items. You can choose the in stock text, the out-of-stock ordering text if you can order, the out-of-stock order text if you cannot order, and the last remaining stocks text. You can choose the number of products to show per page, the pagination, the default sorting, the default order, the number of days where a product is still “new”, if suppliers are shown, if manufacturers are shown, and if illustrative images are shown in item lists and/or pages. You can choose the default currency, the number of decimals, the decimal and thousands separators, if currency symbol is before or after the price, how shipping fees are calculated (by weight or price), if a certain price warrants free shipping, if a certain weight offers free shipping, and the weight unit. If you have store pro, you can enable discount code usage, and determine what the “on sale” text is. Finally, you can choose the default country for customers.
Invoicing
This information gets added to invoices and order forms created by your online store. You can input the store name, email address, merchant address, phone number, fax number, and registration number. You can also choose the order prefix, the invoice prefix, the next invoice number that gets chosen (increased by 1 or more whole numbers), and if the product reference is shown.
Zones
This lets you create and edit zones, which are states or countries that have a common tax or shipping fee. You can choose a name, if this zone is enabled, and the countries and/or states that fall under this zone category.
Taxes
This lets you set tax rates for different zones. You can input the rate in percent, the name, if the tax is enabled, and which zone falls under this tax rate.
Payment Types
This lets you create or select a payment template for your payment options for customers.
Carriers
This lets you create and edit carriers for delivery zones. Each carrier can have a name, tracking URL (for that carrier’s tracking service), details (such as delivery times), tax, handling charges, if this carrier is enabled, and zones associated with this carrier.
Attributes
This lets you create and edit attributes so that a variety of base products can have the same attribute. For example, you can have sizes (S, M, L) and then each product with this attribute automatically creates those product combinations. Each attribute can have a name, value, and color, and can be enabled or disabled.
Suppliers
This lets you create and edit suppliers for your products. For each supplier, you can input a name, enable it, choose the URL, choose an illustrative image, and input details.
Manufacturers
This lets you create and edit manufacturers for your products. For each manufacturer, you can input a name, enable it, choose the URL, choose an illustrative image, and input details.
Homepage
This lets you edit your online store’s home page. You can add any widget previously discussed, as well as edit these. The defaults are: free zone, category list, and new products.
Import
Import products from a CSV file.
Export
Export products to a CSV file.
Editable Zones
This lets you add common content to different types of store pages. Content zones let you add content on all pages in the editable zone on each page. This should only be modified by those experienced with page design.
Store Tags
This lets you manage tags for the store add-on. You can delete, edit, or merge tags here, but cannot create new tags from this location.
Video gallery (14)
Publish a video library on your site.
Video Gallery Dashboard
From here, you can view statistics on the number of published and unpublished videos and categories. You can also view the add-on activity and the latest videos. You can add a new video with the plus sign in the top right corner.
Videos
This lets you view and edit categories and videos, as well as create new ones.
Adding a new video asks for a category (YouTube or Dailymotion), and lets you search for videos on that website (by keyword or URL).
Video Gallery Options
Options lets you choose an add-on title, an illustrative image, add a description, add your YouTube or Dailymotion username so you can import videos from your account, choose the number of videos per cage, choose whether or not to display illustrative images in item lists and/or pages, manage the SEO, and manage the plugins.
Video Gallery Tags
This lets you manage tags for the video gallery add-on. You can delete, edit, or merge tags here, but cannot create new tags from this location.
Conclusions
In conclusion, emyspot is an easy to use, intuitive website builder that provides many useful tools to build any kind of website. However, most of the default templates create a website appearance that is a bit lacking when compared to other website builder templates. If you can get past emyspot’s aesthetics (or perhaps use your own HTML code to improve the aesthetics), then emyspot is a great builder for anyone looking to create a new site.