 Connect
uCoz Website Builder Guide
Introduction
uCoz is a great website builder that provides a lot of customisation options, as well as the somewhat unique ability to modify your HTML code whenever you want. With the ability to choose between personal, business, or online store options, uCoz is a great website builder with a variety of versatility.
uCoz offers one free plan, and five paid plans.
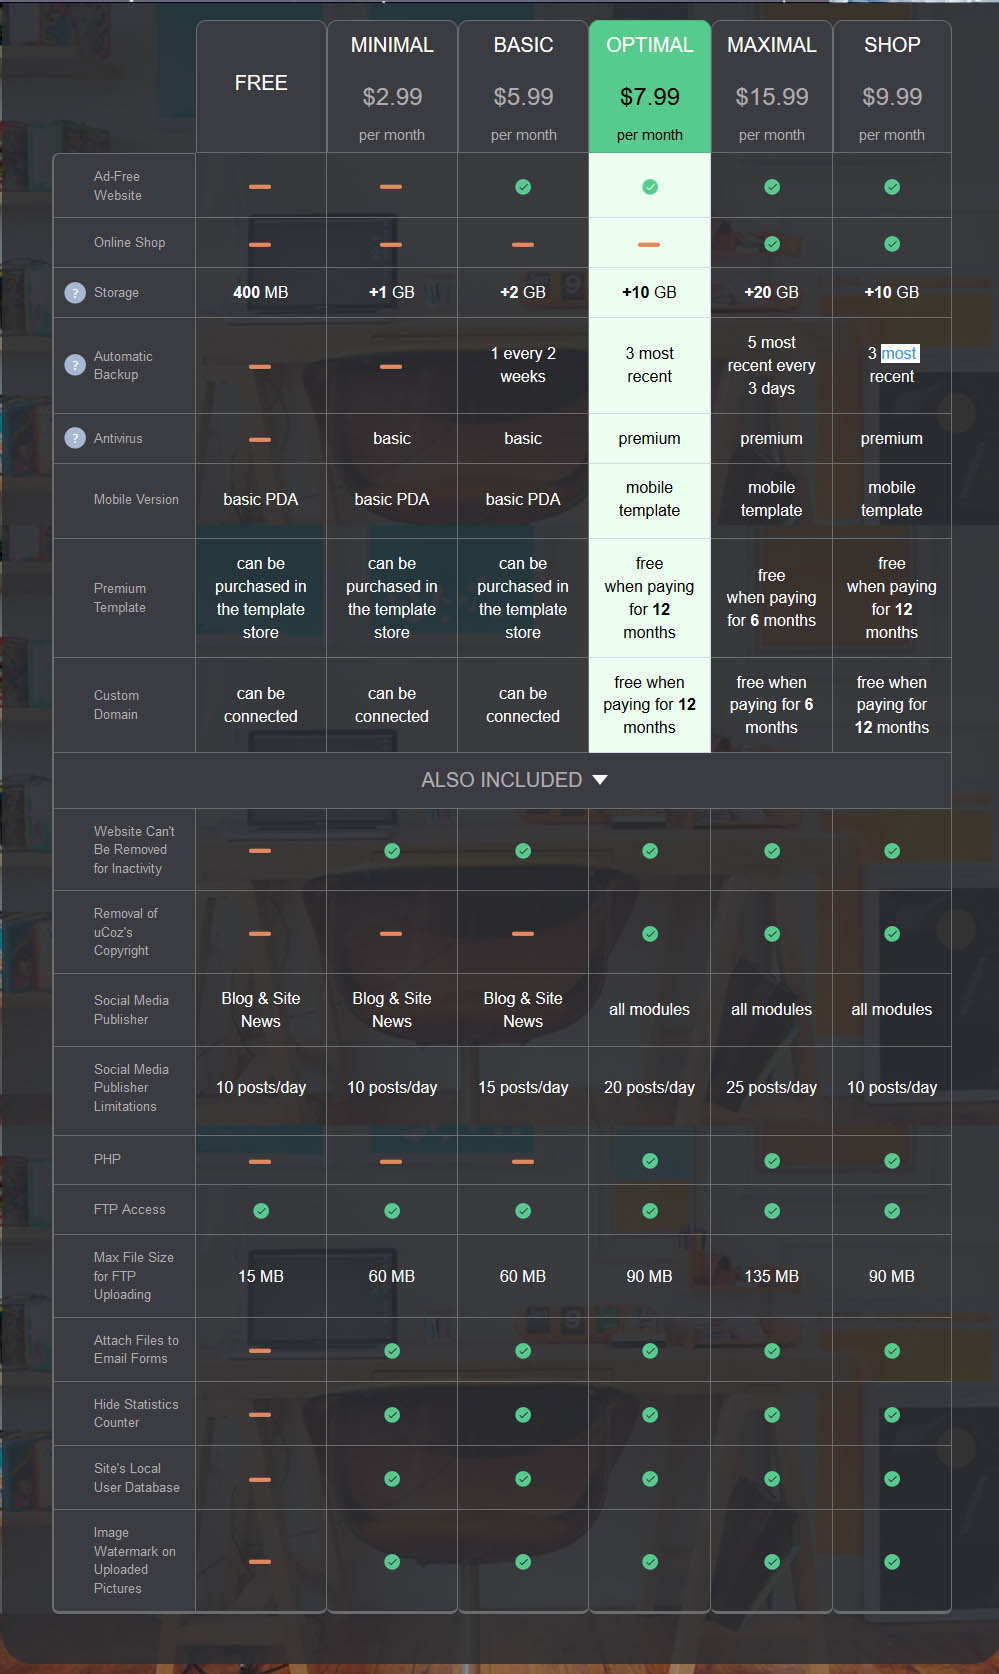
Figure 1: Plan options.
Essentially, the more money that you pay, the more storage you get. A free website allows you 400MB storage, a basic mobile version, the ability to buy premium templates, the ability to connect your custom domain name, a social media publisher for up to ten posts per day, and FTP access. The cheapest plan is “minimal”, which costs $2.99 per month. With this plan, you now get 1 GB storage, a basic antivirus for your website, the promise that your website won’t be removed if you’re inactive, the ability to attach files to email forms, the ability to hide stats counters, a local user database, and the ability to watermark uploaded images. The next plan is “basic”, which costs $5.99 per month. This plan lets you have an ad-free website, up to 2GB of storage, and has an automatic backup once every two weeks. You can also now publish up to fifteen posts per day on the social media publisher. The next plan is “optimal”, which costs $7.99 per month. This allows you up to 10 GB of storage, the ability to save your 3 most recent backups, premium antivirus, a mobile template, free premium templates if you pay for 12 months at a time, and a free custom domain if you pay for 12 months at a time. You can remove the uCoz copyright, publish up to 20 posts per day on the social media publisher, and use PHP. The next plan is “maximal”, which costs $15.99 per month. This allows you to create an online shop, have 20 GB of storage, backs up your five most recent versions in three days, and gives you the template and custom domain for free when you pay for six months. It also lets you post up to 25 posts per day on the social media publisher. The last plan is “shop”, which costs $9.99 per month. This plan is almost identical to the “optimal” plan, but allows you to create an online shop. It also only lets you publish 10 posts per day to the social media publisher.
Once you’ve made a decision about what you wish to pay and what features are right for you, it’s time to start building your web page.
Getting Started
To begin creating a website, go to www.uCoz.com and decide if you want to create a personal, business, or shop website. Whichever one you choose will prompt you to sign up using your email address.
Once you’ve confirmed your site, you can choose a web address. There are several default subdomains that you can choose between. So you’ll have mysitename.ucoz.site. Your options are: ucoz.site, ucoz.club, ucoz.net, ucoz.org, ucoz.co.uk, at.ua, clan.su, moy.su, do.am, ucoz.pl, or ucoz.site.
Your next steps are the “Configuration Wizard”. First, you’ll be asked for your site’s name (for example, your name or your business’s name). Next, you’ll be asked to select a site design (which can be changed at any time in “common settings”). Going to “select design” will take you to a page with various website templates. You can choose to view: all designs, abstract, anime, business and education, computers & communications, food, games, general, glamor, holidays, medicine, music, nature, photo, real estate, sport, or transport. You can also choose to sort them by new, old, or popularity. At right, if you already know the design number you want, you can input it and it will show you the template that corresponds with that number. Then, you can click on any design and it will make it the default template for your page. Once you’ve select a design, it will ask you if you wish to automatically close the template window.
You can then continue to the next page, where you can choose to install various modules on your site. You can choose: a page editor (to integrate other modules), a forum (to allow communication on your page), photo albums, site news, a guestbook (to allow visitors to leave questions and comments), a publisher (to manage article publication), a file catalog, a blog, polls (to survey your visitors), email forms, and an online shop.
After this step, you’ll be taken to the control panel for your web page.
Control Panel
Your control panel is where you can modify the settings for your website. Your control panel menu will look as follows:
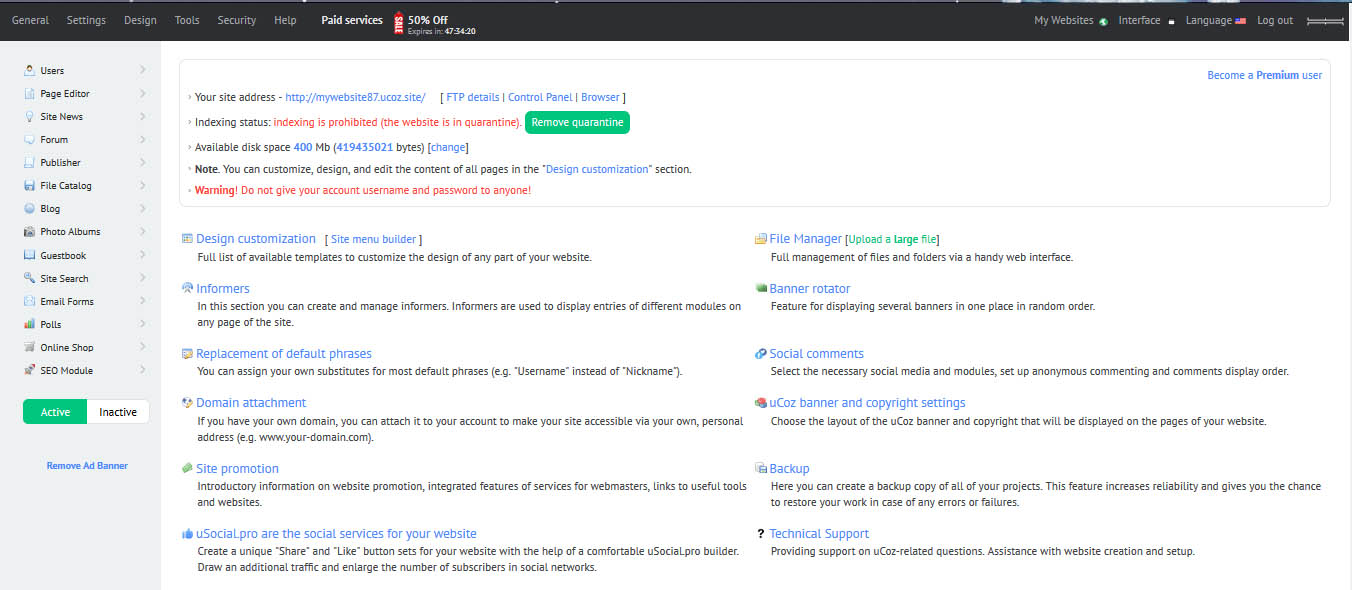
Figure 2: Control Panel
General
View some general information about your website.
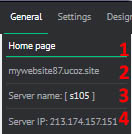
Figure 3: General tab.
- Go back to the main control panel page.
- View a live version of your page.
- Your server name.
- Your server IP.
Settings
This takes you to a page where you can modify various settings. You can either change “common settings” for the entire site, or specific settings for each of your various modules. You can also access your module settings under the selection for users, so these will be discussed later on.
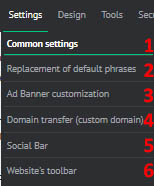
Figure 4: Settings tab
Common Settings (1)
Here, you can change the site name, URL, and site design. You can click on “premium templates” to see paid templates as well. You can also manage your site for a variety of yes or no options. These are: if the website is currently closed, if it is participating in uCoz’s top 100 rating program, if a builder is available to customize your web page, if the “who’s online” feature is active (and up to how many are displayed at one time), if mobile templates are active (these can be viewed by your site URL with /pda added to the end), if comments take on a tree-like structure, if Ajax is disabled (so that all entries will be refreshed when pages are switched), if search engine friendly URLs are used when new pages are created, and if watermarks are added to uploaded images. You can choose your contact details, the default emoticons, the local time, the date and time format, if current date is labeled as “today”, and if the captcha security code that checks for spam is standard or complicated. You can choose your jQuery library (an option that should only be modified by programming experts), if API usage is allowed, the page the main address redirects to, the form type to text entry (visual HTML, BB codes + HTML, or pure HTML), and the visual HTML editor type. You can chose if <br> is used instead of <p> in coding for line breaks, and if the visual comment editor is turned off. Finally, you can shorten external links using u.to, change the !DOCTYPE tag value (an advanced setting), enable an option for visually impaired visitors to allow the adjustment of text size, and the style for entry management buttons.
Replacement of Default Phrases (2)
You can find phrases in your template, and replace those phrases with wording of your choice. To see all replaceable phrases in your templates, click the button “find phrases in templates”.
Ad Banner Customisation (3)
This lets you modify how ad banners appear on your sites. You can choose floating vertical banner, which scrolls as the user moves down the page, or static banner. You can also choose to disable video ads. Finally, you can choose how the uCoz copyright banner appears. The last option is to allow the users to subscribe to website news using a banner or a pop-up menu. A paid plan is required to remove ads or the uCoz banner.
Domain Transfer (4)
If you have a custom domain, you can use this tool to attach it to your website. You can either buy a domain name through domains.ucoz.com, transfer an existing domain, or attach your existing domain name without transferring the domain to uCoz. For one year, it will cost you $14.58 to have a .com, .net, .org, or .biz URL name (provided this domain is available) if you purchase it on uCoz.
Social Bar (5)
This is a way to create social media buttons for your website. Choosing to create a set will redirect you to usocial.pro. Here, you can create buttons to share this site on social media, buttons to follow a page associated with the site on social media, like buttons, social debugs, and meta data builders. If you choose to create a set, it will ask you to drag icons to preview how they’ll appear in your social bar.
Share Buttons
You’re asked to drag and drop the icons you’re interested in sharing with. You can choose: Facebook, Twitter, Google+, LinkedIn, LiveJournal, Tumblr, Spoiler, Bookmarks, and Printer. You can then choose if the icons are square with rounded corners, square, or rounded. You can next decide if they are coloured background with white text, white background with coloured text, grey background with black text, or black background with white text. You can next choose if the icons are displayed along the top, bottom, left, or right of your page with a background, all of which will follow the user up and down the page, or if they’re displayed in a static position and are only displayed where the code is inserted. If the buttons are static, you can choose to orient them horizontally or vertically. If they are positioned along the page, you can choose to view them collapsed or expanded. Next, you can choose the size of the button (48 px, 32 px, or 24 px). You can decide if the buttons have a counter to the bottom or right, and if there is a total share count displayed before or after the button. You can add a “back to top” button (useful if your buttons are located at the end of the page), choose if they are displayed in mobile view, and if you want Viber or WhatsApp options displayed. Finally, you can choose the set name and website address. This will provide a code for you to display on your web page if you sign in to one of your social media sites. You will receive a code that you can then copy and paste to your page for the icons to appear. Once a set has been created, uSocial will let you view statistics on how often users click on those social media icons. You can also choose to get the code once more, edit the icon set, or delete the icon set.
Get More Visitors
This lets you display a popup that asks the user to follow your sites on social media. You can choose between Facebook, Twitter, Google+, LiveJournal, LinkedIn, and Tumblr. You then must input the URL for those sites to determine what social media page they link to. You can drag them to rearrange the order in which they appear. You can choose if the popup window is black or white, the icon colour (same options as before), when they appear (after the page has loaded or after a set time), if the social media icons display the platform name next to them, and the set name and website address for your site. Again, this gives you a code to embed on your page.
Like Buttons
This lets you add a button to allow users to like your page’s posts in order to display them on social media. You can choose to add a like button for Facebook, Google+, Twitter, LinkedIn, Pocket or Tumblr. You can position these buttons on the top, bottom, or a static location that you input onto your web page. You can choose to add a background for top or bottom positions, and to choose horizontal or vertical orientation for static positions. You can also choose to add a “back to top” option. Finally, you can choose the set name and input the address for your website. Again, this gives you a code to embed on your page.
uSocial Debug
This lets you clear the cache of pages to be shared in Facebook posts. Entering the URL page allows you to update the data so it can be shared properly if something is going wrong.
META Data Builder
These allow you to more effectively share pages on social media. You can self-set the page title, description, image link, page link, and website name for Facebook. Twitter asks you to input your website name, page title, and description. Finally, you link to author and website page on Google+, choose a snippet text, and choose a description. This will generate code that you can input onto your website to generate a properly controlled Share button.
Website’s toolbar (6)
Here, you can choose to use a fixed toolbar or mini version when you view your website through uCoz. You can also choose a default expanded view. You can customise the colour (black, white, orange, blue, pink, or green), the position (top/bottom, left/right), the orientation (horizontal or vertical), and if new post comments are notified. Finally, you can choose to hide any of: list of posts, comments, notifications, and site search. Then, select save at the bottom of the page to keep these updated settings.
Design
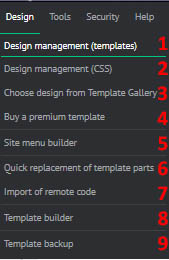
Figure 5: Design tab
Design Management (templates) (1)
This lets you customize how your website’s template appears. It’ll show you a variety of pages that you can customize. You can either change the entire top or bottom of the website, or you can change the first container, which are located under “global blocks”. You can also change the CSS for common templates. Other pages are found under users (things like user login and user registration), comments, site news, blogs, forums, photo albums, publisher, file catalog, guestbook, polls, site search, and online shop. There is also a widget button for each of these pages that allows you to input various widgets into that section of your page. However, all of these modifications requires a working knowledge of HTML.
Design Management (CSS) (2)
This lets you manage your template using CSS (cascading style sheets). This option should only be utilized if you are familiar with HTML.
Choose a design from Template Gallery (3)
This lets you again choose a new default theme.
Buy a premium template (4)
This lets you choose to view and purchase premium templates. You can sort between latest, best, and all. You can also sort by color, subject, function, and price. All templates currently available will cost less than $20. Each template will display its name, rating, and price. If you click on a template, you can choose to buy it, or get a live preview of how this theme functions on a real site. It will also tell you the categories this theme falls under, if you can modify it with template builder, the number of columns, the width, the file size, the views, how many people have purchased this template, the template author, the last update, the description, and screenshots of the template. Some will also allow template installation for an additional fee. This means that a uCoz employee will implement this template onto your page.
Site menu builder (5)
This allows you to modify your site menu. For each item, you will see its name. You can click on its name and drag it to rearrange the menu order. You can click the pencil button to change the name of the page and the URL address. You can also choose to open the link in a new window, as well as give it a CSS class name. Clicking the X will delete the item from your menu. You can nest menu items by holding the plus button. Finally, you can add menu items with “Add menu item”. You can create new menus using the drop down box in the top right hand corner. You can also change your menu name with the “change” option, or remove that menu with the “remove” button.
Quick replacement of template parts (6)
This lets you replace HTML fragments. It functions as a simple “find and replace” formula, similar to what you see in a word document. You can choose between simple and multi-line replacement modes. You can choose to replace in global blocks, use case-insensitive search, replace only the first match, and/or replace the “appearance of entries” only. Finally, you can choose which modules this change applies to.
Import of remote code (7)
This lets you get code from another site and input it onto your page. This means that a page can be located on another website and your own website. This is a complicated procedure and should only be implemented by an HTML expert.
Template builder (8)
This allows you to build your own template. It requires you to build it using HTML. Below, it shows you codes that you can use in any template. It also displays a file manager, the ability to add to design set of default designs, the ability to archive the skeleton, and the ability to save the skeleton. At top, it gives you the option to select a sample skeleton and the skeletons of various standard templates. Building a template will require full knowledge of HTML.
Template backup (9)
This lets you create and view backup copies of your current template. You can choose to restore or remove any of your backups. You can store up to 20 backups.
Tools
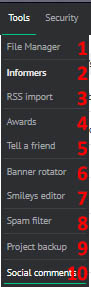
Figure 6: Tools tab
File Manager (1)
This lets you manage the files you have associated with your web page. You can choose to create a new folder or upload a large file in the upper right hand corner. The default folders are forum files and _tbkp. You also have a default 404 page for page not found (which you can personally set), and a default replaceable favicon that appears next to your web page’s name in the browser. At the bottom, you can use the green plus button to set multiple files to upload simultaneously. Next to each file, you’ll have the option to view the link to the file, as well as the option to rename the file or delete the file.
Informers (2)
This lets you display entries of modules on any page in your site (for example, threads or comments to be viewed on the home page). You can then customize the template after creating an informer. For each one, you’ll assign a name and the module you want the informer for. Then, it’ll ask you to choose the data type (entries, categories, or calendar), the sorting mode (date ascending or descending, rating ascending or descending, number of views ascending or descending, entry comments ascending or descending, in random order, or by entry name. You can also choose the number of output entries, number of columns per output, and decide if only current posts are shown (for the current date, the current month, or the current year). You can also change the additional options to change the category and/or entry IDs (to only show ones of that ID number), as well as specify the maximum title length (if you don’t always want it displayed in full).
In the informers menu, you can click on the name of an informer to view its code, click on “informer template” to view the HTML for that informer’s template, and change the options that you set with the informer by selecting “edit informer” (a pen and pencil logo).
RSS import (3)
This allows you to import the RSS feed from another website and display it on your page. You select “add RSS feed”, input its address, and determine the number of entries and columns.
Awards (4)
This option allows you to give users titles that have a certain image associated with them. You can give out distinctions, hearts, food items, and more. You can edit these awards by using the pen and paper symbol. You can choose the category the award is in, the image URL, the award timeout (you can only give it out to someone every x days), and the groups that can give out this award (users, admins, checked, friends, moderators, and all). You can also set this information by using “new award” button.
Tell a friend (5)
This creates a mail form so that visitors can share your pages or posts with friends by entering an email. You will need to input the code created by the form in order to enable this site to be shared using the form. It will ask you to choose the form name, button text, and email message header. You can choose to add fields for the sender’s name, recipient’s name, and comment. Then, you will see the message template, which can be modified if you have working knowledge of HTML. You can edit created forms at any time from this page.
Banner rotator (6)
This lets you display banners on your site in a random order. You can choose to add categories and add banners. When you add a new banner, you can choose the type (image, flash, text link, or full code), the name, the category, the full URL of the banner image, the width/height in pixels, and the site address URL. You can also choose the text under the banner, the priority of this banner item (which indicates how often it will show up), the initial number of exposures to the banner, the initial clicks, the maximum exposures, and the maximum clicks. You can also choose the start and end date of banner exposure, the days they appear on, and the status of the banner (active or inactive).
Smileys editor (7)
This lets you add emoticons to your site. Once you’ve made a set, it will appear once you add it using “common settings”. When you choose to add, you choose the image file, code to implement the smiley on the page, and choose if it is shown near the new message form.
Spam filter (8)
This lets you choose how your website filters spam comments. You can choose to hide posts after a certain number of spam reports, choose the number of reports before it must be pre-moderated, and then gives statistics on the posts reported by users, reported 10 times, and marked as not spam by administrators after users marked it as spam.
Project backup (9)
From here, you can choose to create a backup that saves everything, saves only databases, and saves only uploaded files. You can only create a backup once every seven days, and counts towards your disk space in use. The top right corner will link you to your template backup as well.
Social comments (10)
This lets you choose how comments are displayed. You can choose a commenting type (social or traditional comments), the default subscription value for users (replies to my comment, all entry comments, or no subscription), the theme (light or dark), where comments are enabled (site news, blog, publisher, ad board, photo albums, file catalog, site catalog, online games, video, or online shop), the number of comments per page, if new comments are displayed at the top or bottom, if anonymous comments are prohibited, and if default subscription to comments is enabled.
Security
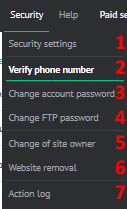
Figure 7: Security tab
Security Settings (1)
From here, you can decide the maximum number of simultaneous logins to control panel, the session timeout before your account is logged out, the security level by IP address, and the security question and answer. You can also choose to only have specific IP addresses and subnetworks be able to log in, but this option is not recommended unless you are very familiar with how it works to avoid locking yourself out of your control panel.
Verify Phone Number (2)
Attach a mobile phone number to your account in case you lose access. It’s an easy way to restore your account information to you.
Change Account Password (3)
Change your account password for your uID account, or for this website only.
Change FTP Password (4)
Change your FTP password.
Change of Site Owner (5)
Change your site owner to a different email or uID profile.
Website Removal (6)
Remove your website altogether.
Action Log (7)
View an action log about time and action events, as well as the user that performed these actions.
Help
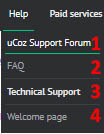
Figure 8: Help tab
uCoz Support Forum (1)
This brings you to the uCoz forum, where you can ask other uCoz members about problems you’re having with your website.
FAQ (2)
This brings you to an FAQ page, where you can view pre-answered questions you may have about your uCoz page. They are separated by categories and subcategories.
Technical Support (3)
Access technical support for uCoz. You can create a message to correspond with the technical team. You will be asked to choose from a variety of preset message categories so that your query gets directed to the right person.
Welcome Page (4)
This brings you to your control panel’s welcome page. It gives you general information, how to post content, how to find help, premium services, custom domain purchase, and custom design.
The top bar of your control panel will also let you purchase paid services, view your other websites, change your interface color, and change the site language. You can also view how much of your storage space you’ve already utilized.
Modules
Modules add additional functionality to your website. Let’s take an in-depth look at each of the module choices now.
Users
At the top of the page, it will tell you the module’s address, the number of registered users, and the most recently registered users. You can also choose to add a new user or view a list of users currently registered to your site. Below, you’ll have options for user management.
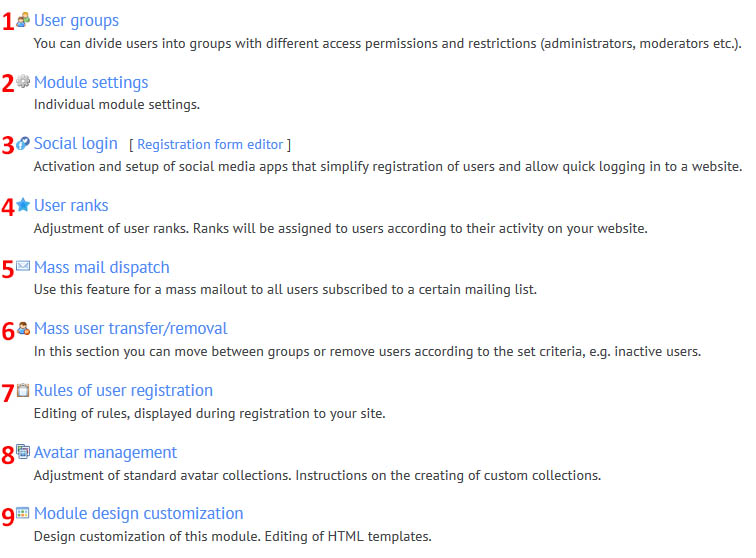
Figure 9: Users settings
User Groups (1)
This lets you view your current user groups with ID, group name, number of users in that group, and group icon. You can also choose to change the group’s permissions using the pen and paper icon next to the group, and delete a group by using the X next to it. You can also create a new group using the appropriate button. The first time you make a new group, you’ll have to set its name, icon, and if a user can select it during registration. You will also be asked to set the permissions manually for this group, but basic permissions are already selected for you.
Each group has different permissions associated with it. You can modify one group’s permissions, change the permissions for all groups, or view what permissions are available for each group using the appropriately named buttons on your user groups’ page.
Permissions are things like not requiring a security code for trusted users to make blog posts, as well as disabling spam check. You can choose who has access to the website builder and admin bar. You can even set permissions for who can view things, like viewing user profiles, viewing blog posts, viewing comments, and more. There are a wide variety of permission options, but the basics are pretty logical. Only administrators can change the website, while moderators have freedom for most of the forum post options.
Module Settings (2)
This lets you change the settings for the user’s module. You can enable or disable the module and choose how users are authorized (uID or local users just for your website). You can decide what fields are required for user registration, and if they appear for the first or second series of forms when signing up. These areas are: email address, password, name, last name, username, date of birth, sex, location, security code, and terms acceptance. You can choose the type of sign in button (new or old), the display style for social login icons (styles 1 through 4), if titles are near social login buttons, if social login buttons are on the form at all, and if social login buttons are in the Ajax login window. You can also choose what fields appear in the user profile that they can choose to modify (home page, date of birth, ICQ number, Jabber, Skype, Yahoo names, country, state, city, sex, signature, avatar, and phone number). You can choose if uAPI is enabled and if a user’s personal page is opened in the same or a new window. Finally, you can choose what information appears on the users list, as well as the order in which it appears. You can choose to automatically display all of the items in the user profile, as well as choosing to show the login, rank, group, registration date, forum messages, and login date. You can also set to block repeated emails (so that only one user can register per email), to block users that have not confirmed emails, the allow a “hidden” option for the user, the record logins to the action log, and to allow extra options for the gender filed. You can also set a maximum length of signature, size of avatar, and dimensions for avatar. Finally, you can choose to enable various features: user reputation (and how long before the reputation can change), awards, user rank, avatar uploading, private messenger, and mailing list subscription.
Social login (3)
This lets the user use social media sites to more easily create and login to their account. You can either use the default apps for these sites, or create your own application (this option will link you to that social media site in order to create your own app). The options are Facebook, Google+, and Twitter.
User Ranks (4)
This lets you assign ranks to users based on activity. You can choose the rank name, and the number of posts to achieve this rank. You can choose from sixteen different icon types for the user ranks. Again, you can turn on user ranks in the module settings.
Mass mail dispatch (5)
This lets you create a mass email to send out to all of the users on your site. The feature must be enabled in user settings before it becomes functional. When you choose to create a dispatch, you will be asked to choose an email subject name, a reply address, and the message text. You can also add values that are personalized depending on the user receiving the email. You can personalize user (with $USER$), name (with $NAME$), and email (with $EMAIL$). Input any of these codes into your email for them to be effective. You can also add a category to the email which will only send out messages to users subscribed to that mailing list category. You can view previously sent messages with the “mail out archive”, and subscribers to see what users are in what mailing list categories and what group those users are in.
Mass user transfer/removal (6)
This lets you move users between groups, remove users, and inactivate users. You can do this based on users that registered or last visited a certain amount of time ago. You can also choose only certain groups, only users with low or no activity, and/or only users without confirmed emails. You can choose to remove or move these users. The removal action is non-reversible.
Rules of user registration (7)
These let you set the rules that users agree to when they register to your website. You can also restore the default template, manage it with the visual HTML editor instead of the normal HTML editor, and use the file manager to upload a set of rules that you’ve written.
Avatar management (8)
This lets you manage standard avatars and create your own collections. You can select which of the default avatars are available for users to utilize. You can also add your own set of avatars by creating an “ava” folder in your file manager.
Module Design customization (9)
This lets you use HTML to customize this module. This can also be achieved from the normal design customization menu.
Page Editor
This lets you add new pages to your site, as well as edit the pages you’ve already created.
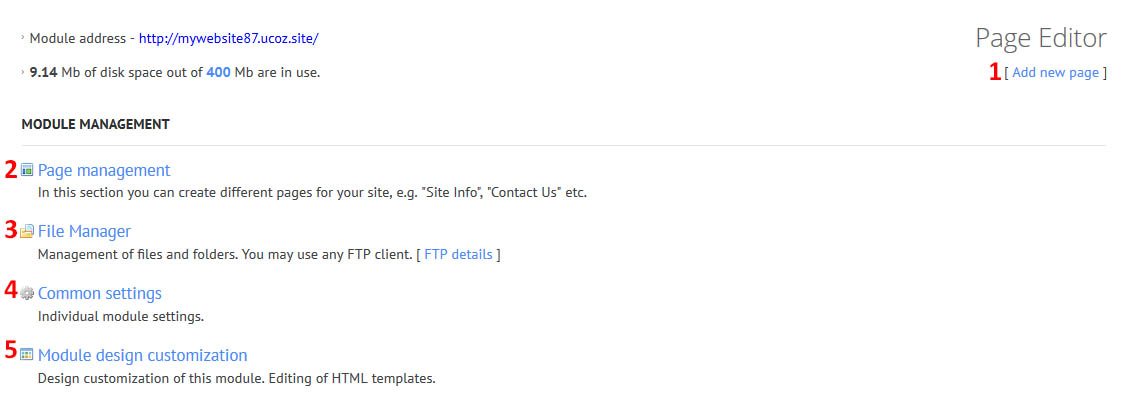
Figure 10: page editor module
Add a new page (1)
This will load a new page menu that displays the visual editor. You can also edit the HTML code. Your page will default have the layout that you have selected for your website. You can then modify the content that appears within this page using the content editor. Note that your header, sidebar, and footer will remain the same unless they are specifically modified.
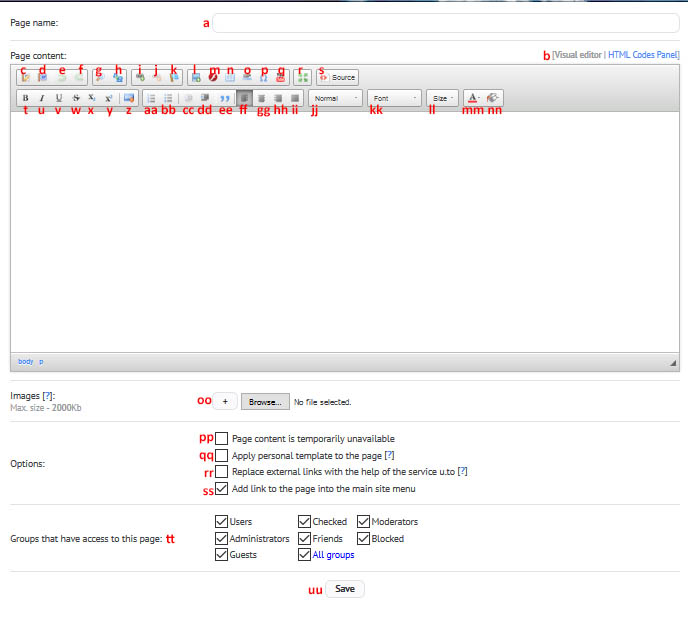
Figure 11: New page editor
- Change the page name.
- Switch between visual and HTML editor views.
- Paste something you have copied as plain text.
- Paste something you have copied from Microsoft Word.
- Undo last change.
- Redo last change.
- Find a word or phrase.
- Replace a word or phrase everywhere on the page.
- Insert a link.
- Unlink an inserted link (make the link plain text).
- Anchor an element on the page.
- Insert an image.
- Insert a flash file.
- Insert a table.
- Insert a horizontal line.
- Insert a special character.
- Embed a YouTube video.
- Maximize the editor to fill your window.
- Edit the source code.
- Bold the text.
- Italicize the text.
- Underline the text.
- Strikethrough the text.
- Input a subscript.
- Input a superscript.
- Remove formatting from the selected text.
- Create a numbered list (or remove a numbered list).
- Create a bulleted list (or remove a bulleted list).
- Decrease indent
- Increase indent
- Insert a block quote.
- Align left.
- Align center.
- Align right.
- Justify text.
- Choose the text format (paragraph formatted, normal, heading 1, heading2, heading 3, or formatted).
- Choose the font.
- Choose the text size.
- Choose the font color
- Choose the background color.
- Upload images to display on your page.
- Choose to make the page content unavailable.
- Choose to apply your own template to the page, instead of the default design.
- Replace external links.
- Add a link on the page to the main site menu.
- Choose which groups have access to this page.
- Save your changes to the page.
Page Management (2)
This allows you to view your currently created pages and modify them. It will display the ID nubmer, page name, files, and date it was created. Clikcing on the page name will take you to a live preview of this page. Choosing the eyeball icon let you use the visual editor to modify this page. Choosing the “eidt information” button or the pen and paper icon let you change the page using the HTML editor. Finally, the X will delete your page. You can also add a new page from here with the appropriately named button.
File Manager (3)
This brings up the file manager.
Common Settings (4)
This takes you to the common settings for your site, as described earlier under the “settings” tab.
Module design customisation (5)
This lets you use HTML to customizs your pages. This can also be achieved from the normal design customisation menu by selecting “site pages”.
Site News
This lets you manage your site news module.
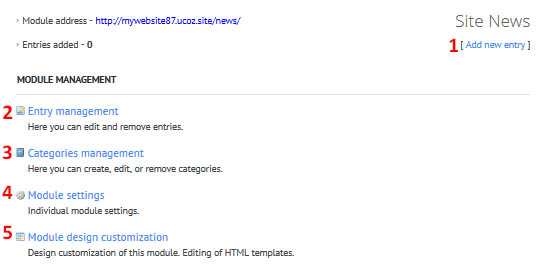
Figure 12: Site News module
Add a new entry (1)
This lets you add a new entry to your site news module. It will bring up an editor identical to the one described in the “add a page” module, but will do so in the context of your template. In addition, you can choose who added the entry, if image links are attached to the message, and the tags for the entry. You can also choose if the entry cannot be viewed, if comments are allowed, and if external links are replaced with shortened links by u.to.
Your final result will look like this:
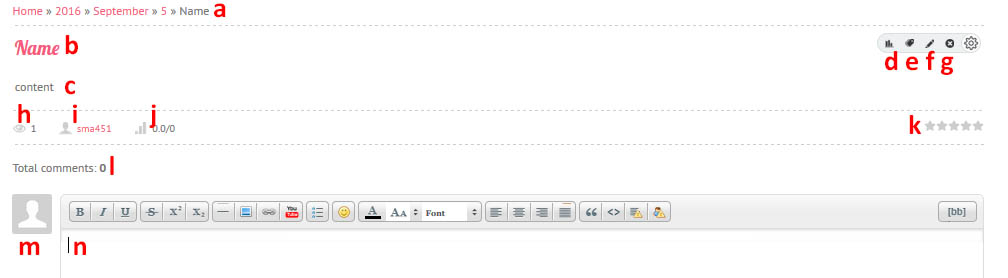
Figure 13: New site news entry
- This is the link chain that leads to your news result. You can see that it’s organized by date, with the title of your post being the last component.
- This is the title of your news post.
- This is where the content of your post will be displayed.
- Modify the counter on your page (page views and rating).
- Modify the entry tags.
- Bring up the entry editor.
- Remove the post.
- This is how many views the post has.
- This is the author of the post, with a link to their user profile page.
- This is the average rating of the post.
- This allows you to give the post a rating.
- This is the number of comments on the post.
- This is the avatar that will be displayed when you make a comment.
- This is the area where your comment can be crafted for submission.
Entry management (2)
This lets you manage entries to your site news. You can click on the title to give that news post on your web page. You can click on the user to view the user’s profile. Finally, you can click on the pen and paper icon to edit the entry. The X button will delete the entry.
Categories management (3)
This lets you create, editor, or remove categories. You can then click on the category to see entries that are in this category, or to add an entry to this category with the appropriately named button.
Module settings (4)
This lets you change the settings for site news. You can choose if this module is a part of the uCoz catalog rating, choose the number of columns in the categories menu, and decide if the number of contained entries is near the category name. You can also set the number of posts on the main page, the number of posts per page in the categories menu, the number of posts per page in the archive, the number of entries in TOPs, and the number of records in RSS feeds created from your site news module. You can choose if the arrows to change pages are located at the top, bottom, or both. You can also enable the uAPI for the module, choose the sorting mode (entry date ascending or descending), enable notification of administrators about new comments and entries via email, and enable the ability to rate entries. Finally, you can choose the fields in your new entry form. You can choose from: entry name, brief description, full text, images, additional fields 1-5, and notification about comments. The field names can be changed in your replacement of default phrases menu. You can add even more additional fields with the “use additional fields” option, and then select the number of extra fields in the drop down menu. You can choose to only show a brief version of the text if it’s too long, and the number of characters to display. You can sort the order of the fields in the “fields sorting” box, by moving them up or down and adding or removing separators. You can also determine the maximum number of images in a post, the dimensions of an image that has to be reduced to fit, the maximum dimensions of an image, and the maximum size in kilobytes of an image. Finally, you can enable the ability to choose the date of entry, enable an “always on top” feature, choose if this only functions in categories if you do enable it, and enable the ability to search for a user’s entries. At the bottom, it also tells you what permissions with regards to this module each user group has.
Module design customisation (5)
This lets you use HTML to customise this module. This can also be achieved from the normal design customisation menu.
Forum
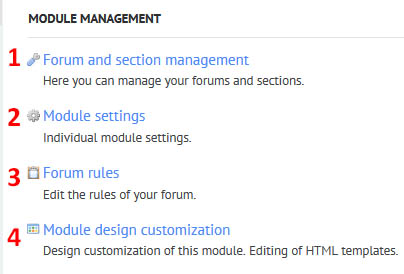
Figure 14: Forum module
Forum and section management (1)
This lets you manage all of the forums you have on your webpage. You can create categories under which you have different forums, and then your forums can have sub-forums. Each section has a name, URL for its icon, and can be given its own rules.
Each forum has a section, a state (active, read-only, or disabled), a name and description, and an optional set of rules. You can also set a password so it’s a private forum, set a personal icon to appear next to the forum, and choose users to be forum moderators to have moderator permissions on this forum. You can also choose to not have the post count increase when posts are added to the forum, choose if threads from the forum can’t be displayed in “new posts”, choose who the forum entries can be read by, choose who new threads can be posted by, and choose who can post replies. Sub-forums have the same set of options. You can edit any of these settings at any time using the pen and paper icon next to the section, forum, or sub-forum name.
You can also click on the “organise forums” button, where you can drag the forums and categories around to rearrange their orders.
Module settings (2)
Here, you can change your forum settings. You can change the module name, and if it is in the uCoz top forum rating. You can choose if the title has old structure, and if the reply form to a forum post is on a separate page. You can choose if AJAX is used for post editing, the button set for your forum, and the icon set (or a link to a folder with a personalised set of icons). You can choose the number of threads per page, the number of posts per page, the number of records in the RSS feed for the forum, and the maximum message length. You can choose to enable uAPI for the forum, decide if there is a views column in the treads list, if there is a description of the status icons that you have crated, if there is a block with the list of user’s permissions associated with their name, if the user’s online/offline status is displayed, and the number of messages before it is considered a “hot” thread. You can choose the maximum number of files uploaded at once, the maximum uploaded file size, the dimensions of a reduced image, and the maximum dimensions of a full-sized image. You can choose how many days during which users can choose to edit and remove their threads and posts, and the number of posts required before a user can create a new thread. Finally, you can show all site visitors in a “who’s online” section (if not, only forum visitors are displayed), choose to notify administrators about new entries by email, inform moderators about “bad” messages, and enable emailing about new replies. Below, you can see the user groups that have various forum permissions, if you want a wiki-like post for threads where the first post is fixed, and if you have sub-forum threads hidden.
Forum rules (3)
This displays your current rules for the forums. There is a default template, which you can modify at your leisure using HTML or visual HTML.
Module design customisation (4)
This lets you use HTML to customise this module. This can also be achieved from the normal design customisation menu.
Publisher
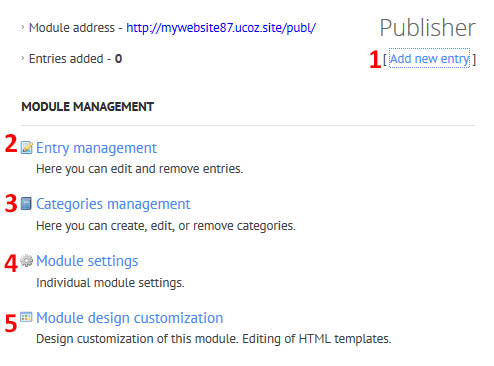
Figure 15: Publisher menu
Add a new entry (1)
This lets us add a new article to your web page. This gives you an editor embedded within your website similar to the one for a site news post. Again, you can choose a category and entry name. You will use the same visual editor for filling out posts, but this time you can fill out forms for a short description as well as the full entry text. Below, you can add images, your full name, your email, your website, the link to the entry source, and tags for your post. You can choose which user wrote the entry, if the entry is not available for viewing, if you will allow comments, and if you want to replace external links with u.to. The display page on your site looks the same as the site news post.
Entry Management (2)
This lets you manage entries you’ve made on your page. You can view your total number of posts and number of pages. You can sort the entries by blog, file catalog, site news, photo albums, publisher, or page editor. You can also sort by categories, as well as to show only active or inactive entries. For each entry, ti displays the ID number, the entry name, the category, the user who posted it, the date it was published, the option to edit it, and the option to delete the post.
Categories Management (3)
This lets you add or edit your categories. You can add a section to group your categories if you have a lot of them. This requires a section name, description, and determining the groups that have access to the section. If you choose to add a category, you should provide the category name, description, groups that have access to the category, and the groups that have permissions to add new entries to the category. You can also drag to rearrange the category order. You can also view articles in each category by clicking on the category name, and edit the category by using the pen and paper icon.
Module Settings (4)
This lets you edit the settings for this module. You can choose its name, if it is a part of the uCoz catalog rating, and the number of columns in the categories menu. You can choose if the number of posts is displayed next to the category name, if the section description is under is name, and if the category description is under its name. You can choose the number of posts on the main page, the number of posts per page in sections, the number per page in categories, the number of entries in TOPs, and the number of records in the RSS feed. You can choose if uAPI is enabled, if the entry rating feature is enabled, and the default sorting mode for the main page, sections, categories, and list of user’s posts (by user sorting, entry date ascending/descending, entry name ascending/descending, entry rating ascending/descending, entry comments ascending/descending, number of views ascending/descending and entry edit date). You can choose to display a menu to sort entries, and the items available to sort by (date, name, rating, comments, and views). You can choose if administrators are notified about new entries and comments by email. You can choose what fields are in the new entry form (name, brief description, full text, images, author’s name/email/website, link to entry source, and notifications about comments). You can also choose fields sorting and separators. You can automatically add http:// prefix to fields for author’s website and link to entry source. You can choose the maximum length of a brief description, the maximum number of images, the dimensions of a reduced image, the maximum dimensions of a full-sized image, the maximum size of an image, and the compression quality of JPG images. Finally, you can choose to enable to choose date of entry adding, enable “always on top” feature, choose if it only functions in categories, choose to be able to search for a user’s entries, and let an entry be in several categories. At the bottom, you can view what users have different group permissions.
Module Design Customisation (5)
This lets you use HTML to customise this module. This can also be achieved from the normal design customisation menu.
File Catalog
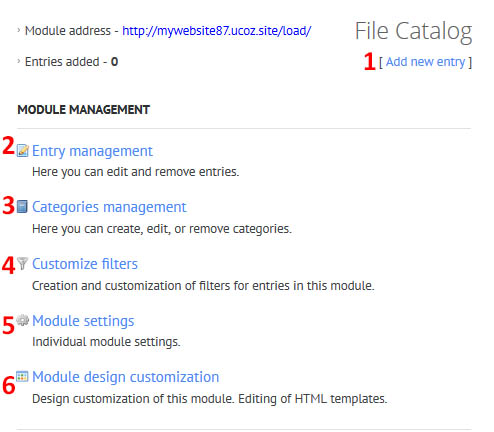
Figure 16: File catalog settings
Add a new entry (1)
The editor for this is identical to that for the publisher, complete with a short and long entry text. You can choose up to 15000 kilobytes of files to this item. You can also provide a link for downloading archives from another server, as well as list the archive size on the other server. All other options are the same as the publisher.
Entry Management (2)
This page shows all of your file catalog entries. You can sort by category. It will show the ID, entry name, user who uploaded the entry, the files included, and the date it was uploaded.
Categories Management (3)
This lets you manage the categories for your file catalog entries. You can add a new one, as well as add a new section to group categories. You can also modify your categories, as well as see the entries under each category.
Customise Filters (4)
This lets you set filters so that visitors can find items they’re looking for more easily. That way, users can filter the file catalog content to search for specific things.
Module Settings (5)
This has the same settings as the publications module.
Module Design Customisation (6)
This lets you use HTML to customise this module. This can also be achieved from the normal design customisation menu.
Blog
This lets you create and edit blog posts on your page. It works identically to the publisher module, but displays under the blog page instead.
Photo Albums
This lets you add a photo album to the page. It has the same module management tools as the file catalog, but appears slightly differently on your page.
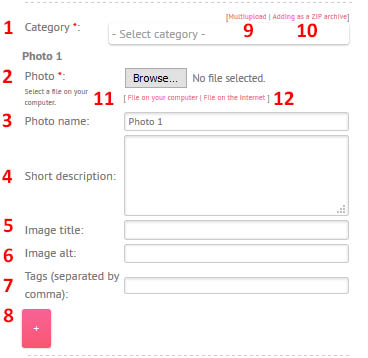
Figure 17: Photo Album entry form
- Select a category to place the photo in.
- Choose a photo from your computer to upload.
- Name the photo.
- Give the photo a description.
- Give the image a title.
- Give the image alt text.
- Choose tags for the image.
- Add another photo to the album in this category.
- Upload multiple photos at once.
- Add multiple photos as a ZIP archive.
- Choose a file on your computer.
- Choose a file from the internet.
Guestbook
This lets you add a guestbook where users can comment on your page.
In module settings, you can choose the name, if new entries are at the top or bottom, if the guestbook new entry form is in a separate page, and if the new entry form is at the top or bottom of the page. You can enable uAPI, the entry rating feature, and to notify the administrator about new entries by email. You can also choose which fields are in the new message form: email, www, icq, country, city, or state. You can choose how many posts are displayed per page, the maximum message length, and the maximum number of entries. Finally, you can choose a list of words and their substitutes (for example, replacing curse words with x’s).
You can also change the module’s design customisation similar to the other modules.
Site Search
This lets you add a search bar to your webpage.
In module settings, you can choose the number of posts per page, the maximum total number of search results, the maximum number of characters in the results description, and the ability to supplement search results by tags with site search results. Finally, you can choose which modules the search bar looks through.
Email Forms
This lets you add an email form to your webpage. You can only attach files to a message if you have a premium plan.
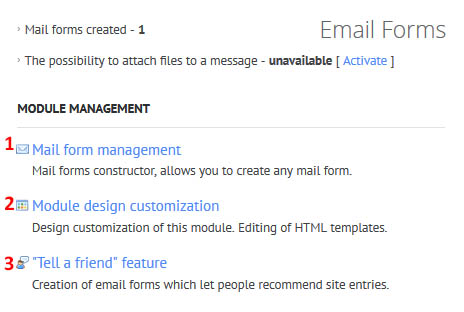
Figure 18: Email Form options
Mail Form Management (1)
This lets you construct a mail form. You can choose the name of the mail form, the emails of recipients, and the text that displays when the form is successfully completed. Next to each form name is a “field constructor”. You can choose to add a text field, a checkbox, a dropdown box (“select”), a security code, a text area, or a radio button. For those fields where you can input multiple options to choose from (checkbox, select, and radio), you’ll need to input each value on a separate line. You’ll be asked to input a field name, as well as determine if the field is required.
Module Design Customisation (2)
This lets you use HTML to customise this module. This can also be achieved from the normal design customisation menu.
“Tell a Friend” Feature (3)
This lets you create a form so that visitors to your website can send an email to their friends letting them know to visit it. You will be asked to choose a form name, button text, and message subject (called message header). You’re also able to add fields for the sender’s name, recipient name, and comment. The default form can be modified, but you should be careful changing it if you aren’t familiar with HTML.
Polls
This lets you create or edit polls on your site. Each poll lets you ask a question and choose several possible answers (up to 15). If you use the file manager, you can use images instead of answers in the poll. You can choose if the poll form uses radio buttons, checkboxes, multiple checkboxes, or links (for pictures). Finally, you can choose the poll start and end date, the button text, the groups allowed to vote, and if the poll is active.
The settings let you choose the timeout (how long before a person can vote again), if email notifications are active, if polls are archived automatically, and if uAPI is enabled. You can also customise the module.
Online Shop
This lets you create an online shop for your page if you have a paid plan for your website. To learn more about this option, and if you wish to pay in order to enable this feature, visit http://www.ucoz.com/tour/mod_eshop.html.
SEO Module
This lets you manage your search engine optimisation.
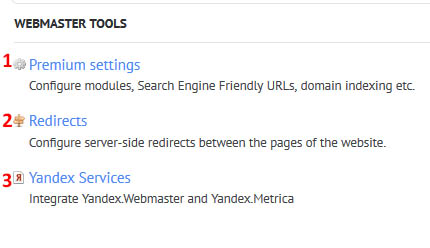
Figure 19: SEO module settings.
Premium settings (1)
These options are only available if you have a premium plan. You can choose to specify unique titles, descriptions, or keywords for modules, categories, and posts. You can choose custom URLs for modules, categories, and posts. You can also prohibit domain indexing by search engines, use canonical attributes for posts, activate the form so robots.txt can edit, and prohibit the search engines from indexing the Guestbook.
Redirects (2)
This lets you choose 301 redirects when moving posts between URLs, so that you can remain at the same position on a search engine but still change the URL to what you want it to be. You’ll need to add the source and target pages. You can also see how many redirects you’ve used and how many you have available.
Yandex services (3)
This lets you connect Yandex.Webmaster (to see the citation index, the number of loaded/indexed pages, and more) and Yandex.Metrica (to increase the website conversion and analyse visitor behaviour) tools.
Builder
To access the builder tool, you’ll need to go to the live version of your website and login as the administrator. When you do, a gear appears in the top left corner of the page, which can display the builder options. Any entry on your page will also have a gear next to it, which will allow you to do counter management, entry tags, editing, and removal.
Note that a version of this bar will appear to any user who longs into your site. The options available to them are based upon the options you’ve granted that user’s group.

Figure 20: Builder menu
Profile (1)
From here, you can view how your user profile appears on the website, and can edit your user details from this menu. You can also choose what colour popup windows are on your site (blue, green, grey, pink, orange, black, or black and white). You can also access your uID profile page from here. You can also view a list of all website users, their avatar, their rank, their group, their registration date, and their messages. You can also search for users with the search bar using a variety of filters.
Messages (2)
From here, you can view your private messages inbox, sent messages, craft a new message, or send out a mass message. When you choose to craft a message, you’ll need to choose the recipient and subject. You can either view a list of users, or use a search bar to find users. You can preview, send, or cancel once you’ve crafted your message. Mass dispatch lets you choose entire user groups instead of inputting individual usernames.
Information (3)
This tells you the website server, the option to log in to the control panel, and the option to view the toolbar settings.
Entries (4)
This lets you view your posts. They will be displayed under the category in which they were published, and the number of posts in that category will be displayed next to it. You can also view your inactive posts here.
Comments (5)
From here, you can manage all comments, or manage just your comments that you have made.
Add New Entry (6)
You can access the page editor from here. You can also choose to add a new post to your various modules.
File Manager (7)
This displays the amount of storage you have currently used, as well as access your file manager.
Security (8)
From here, you can choose to remove posts of certain users, block certain IP addresses, have a list of banned users, or have URLs that are blocked.
Shop (9)
From here, you can view your balance, items, shopping cart, price list, orders management, and wish list.
Notifications (10)
This lets you set how you are notified about various updates on the page. You can choose by website section or comment type, and you can choose to be emailed or private messaged.
Search (11)
This lets you search the website for a word or phrase.
View Site As… (12)
You can see how the website is viewed as members of your different user groups.
Design (13)
This is how you enable the actual builder tool. In builder mode, each section will have eyeball button that lets you modify the post in the visual editor, and a button with lines that lets you edit the post with the HTML editor.
For items on your sidebar, there are up and down arrows so you can swop the various section categories. You can also add new elements by using the calendar button, or change a widget by using the gear button. Clicking on labels will allow you to change what the name of the element is displayed as.
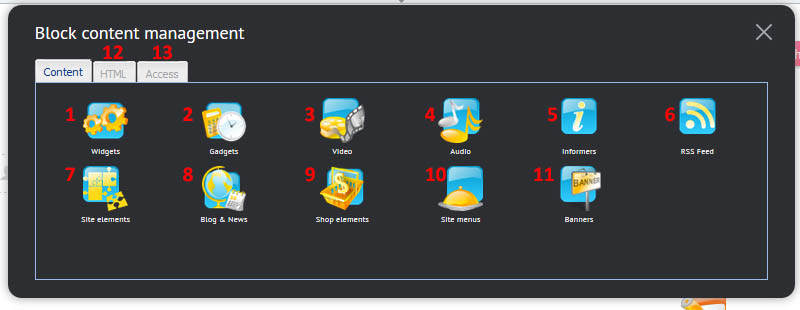
Figure 21: Block content management
Widgets (1)
This gives you the option to add a variety of widgets to your page. The categories for widgets are import, effects, video and audio, website functionality, browser tricks, business and finance, and other.
Import includes things like various image and video embedding apps, as well as different social media embedding widgets. Effects are 3D tag clouds, snowfall, and an image slideshow. Video and audio let you embed a simpler or playlist player. Website functionality includes things like special menus with different effects, countdowns, pop-up tips, season display, and day of the week display. Browser tricks let you add an “add to favorites” button, open a link in a new window, prevent right click, a link to print the page, and a shifting title tag. Business & finance let you do a news ticker, calculator, or pie chart. Other lets you upload files and add ICQ or Skype status. Each widget will have its own display parameters that you can set once you click on it.
Gadgets (2)
This lets you add a variety of gadgets to your page. The categories for gadgets are news, tools, communication, fun & games, finance, sports, lifestyle, and technology. News includes things like feeds from BBC, CNN, and other news websites. Tools includes things like an online translator, Google talk, a timer, and more (a very broad variety of items). Communication includes things like quote and image feeds. Fun and games includes a variety of games that can be played on your site. Finance includes things like stock and oil prices. Sports includes things like NBA news, sports photos, and specific sports team updates. Lifestyle includes things like games, recipes, and pictures (a very broad range of items). Finally, technology includes things like address, IP lookup, zip code lookup, and Google set search. Each gadget will have its own display properties that you can set once you click on it.
Video (3)
This lets you input a video URL so that you can embed a video on your page.
Audio (4)
This lets you embed a simple or playlist player on your page. To choose songs for your player, use the “select” link to open your file manager. You can also customize some aspects of the player’s content.
Informers (5)
This lets you add informers that you created in your control panel.
RSS Feed (6)
This lets you display an RSS feed that you have already imported in the control panel.
Site Elements (7)
This lets you add a login form, categories, channel categories, a tag cloud, site friends, a site search function, or a polls display.
Blog & News (8)
This lets you display a calendar, categories, archive, search, or tag cloud to display blog or news entries you have created on the sidebar of your page.
Shop elements (9)
This lets you add a shopping cart, currency, or product filter for your online store management.
Site menus (10)
This lets you add a menu that you created in the control panel.
Banners (11)
This lets you display banners that you have added to the “banner rotator” in the control panel.
Some items will have a wrench displayed next to hem, which allows you to change the settings you have made for that particular element.
Conclusions
Overall, uCoz is a cheap and efficient website builder. However, if you aren’t familiar with using HTML, the customisation options are rather limited. In addition, a lot of the templates are rather outdated. However, this is one of the only website builders that allow you to create user groups easily in even the most basic plan. If you wanted to create a website that functions mainly through forum communication, this would be by far the best website builder to choose. However, it won’t work well for all website types.