 Connect
Yola Website Builder Guide
Introduction
Yola is an easy to use website builder that offers a variety of editor options and widgets, making it an easy way to build a wide variety of website types.
Yola offers four different plans to choose from. You can choose free, bronze, silver, or gold. You can choose to pay annually or monthly, but note that if you pay monthly the price goes up substantially.
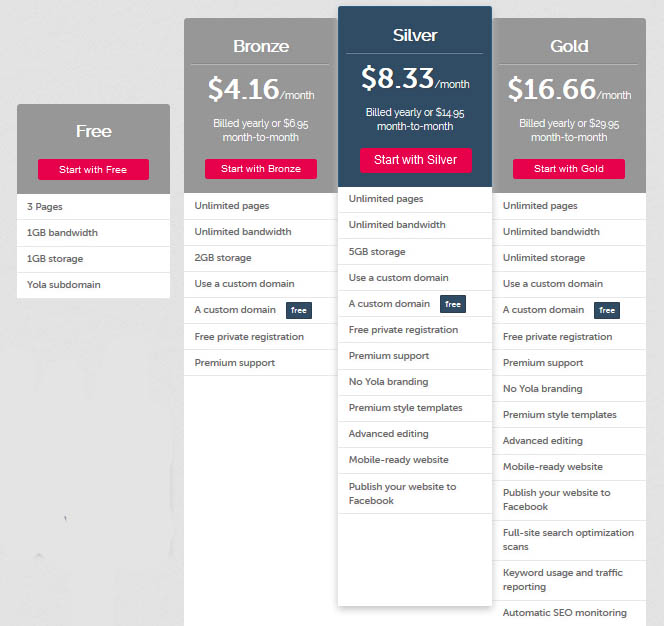
Figure 1: Yola Plans
The more you pay, the more storage you get. In addition, all paid plans provide unlimited number of pages and unlimited bandwidth. You also get a free custom domain instead of a Yola subdomain that appears as SiteName.yolasite.com. You also get premium support with each plan, and can implement private registration on your site. The Bronze plan costs $4.16 a month if you pay annually ($49.92) or $6.95 for monthly payment. With this plan, you get unlimited pages and 2GB of storage. The Silver plan costs $8.33 a month if you pay annually ($99.96) or $14.95 for monthly payment. This gives you 5GB of storage, and lets you remove Yola branding, access premium templates, publish your website to Facebook, create a mobile-ready website, and access advanced editing. Finally, the Gold plan costs $16.66 a month if you pay annually ($199.92) or $29.95 for monthly payment. This gives you unlimited storage and monitor your search engine optimisation. Finally, Yola also offers you the option to purchase a custom domain for $11.95 a year, get a personalised email address for your website for $9.96 a year, or add an online store for $10.00 a month.
Once you’ve chosen what plan you’d like to use on your website, it’s time to get started!
Getting Started
Head on over to yola.com and choose the “start for free” option. To register for a site, it will ask for your name, email, and password. Next, it will ask you to choose a template for your website. For each template, you can hover over it and choose “view details” to see the types of websites this template is recommended for, as well as get a live preview for how this template will function as a real website. If you aren’t happy with any of these options, you can scroll to the bottom and choose “start with a blank template”. Once you’ve made a decision, you will be asked to name your website, as well as be provided with the option to input your contact information to be automatically added to your contact page. Then, you’re ready to start editing your website with SiteBuilder.
Site Builder
Once you’ve established your website, it will bring up the site builder.

Figure 2: Site Builder
- Brings up the main Yola menu.
- Save changes you’ve made to your website.
- Publish the changes you’ve made.
- Upgrade to a paid plan.
- Buy a domain for your website.
- Open the widgets menu.
- Open the style menu.
- Open the page menu.
- Open the settings menu.
- Open the SEO menu.
- Open the navigation menu.
- Open the files menu.
- Open the mobile view of your site.
- Open the desktop view of your site.
- This is where the submenu for each menu tab for options 6-12 will appear.
- Re-load page.
- Open the style designer (can also be opened through the style menu).
- Enter full screen mode.
Widgets (6)
Widgets can be dragged from the top submenu to the location you wish to use them on your page. You can choose to turn on the borders so your widgets are more easily identifiable. There are a variety of categories you can choose from for your widgets. You can choose between popular, media, ecommerce, social, forms, and misc. We’ll cover what each widget does in turn now.
Text
Located in: popular
When you input a text widget, the text editor menu will appear.

Figure 3: Text Editor
- Undo
- Redo
- Bold Text
- Italicize Text
- Change text color.
- Insert a link. You can choose between a page on your site, an external link, an email address, or a stored file. You can also choose the link title and whether or not the link gets opened in a new window.
- Align left.
- Align center.
- Align Right.
- Change the text formatting (paragraph or headings 2-6).
- Insert a block quote.
- Insert a bulleted list.
- Insert a numbered list.
- Increase indent.
- Decrease indent.
- Add an image. You can either upload a new image or browse previously uploaded images
- Must select an image to use this feature. Place the image to the left of text.
- Must select an image to use this feature. Place the image to the right of text.
- Must select an image to use this feature. Change the image’s alt text.
- Clear text formatting.
- Open style designer.
Picture
Located in: popular, media
Inserts a picture onto your page. You can either choose from previously uploaded files, or upload a new file. There is a search bar to look for a specific image that you have uploaded, and at the bottom there is a display of how much storage space you’ve already used.
For uploaded images, you can change their appearance by clicking on them and selecting the paintbrush. This brings up the photo editor. You can choose to enhance the image, add effects, add frames, add stickers, crop the image, resize the image, re-orient the image, and focus the image. You can also change the brightness, contrast, saturation, warmth, and sharpness. Finally, you can splash a color, draw on the image, add text, fix redeye, whiten the image, or fix blemishes.
Gallery
Located in categories: popular, media
Inserts a photo gallery onto your page. Again, this takes you to the image upload page to choose from uploaded images or upload new ones. You then click on as many images as you want to put in your gallery, and choose “select”. To modify your gallery, click on it and select “edit” in the upper left corner.
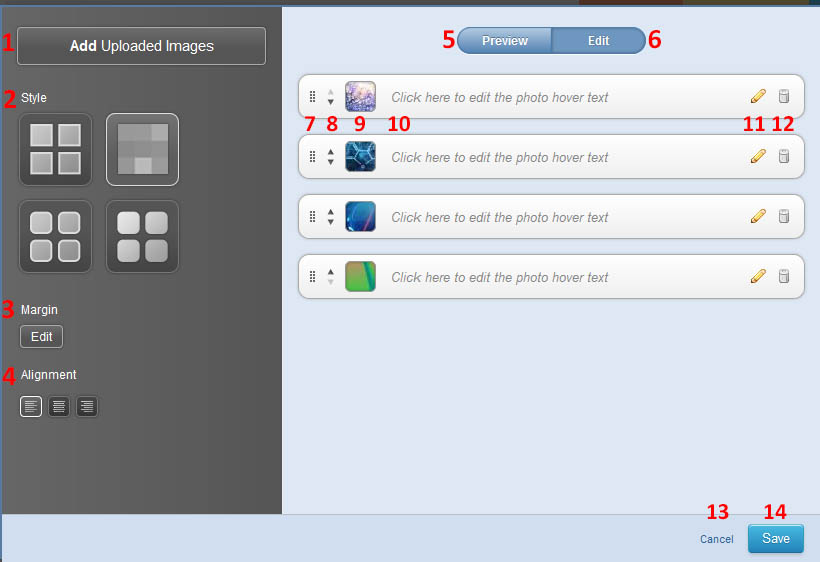
Figure 4: Gallery Editor
- Add more images to your gallery.
- Change the style of your gallery. Your options are: squares with borders, squares stuck together, rounded squares with borders, and rounded squares without borders.
- Edit the margins for your gallery widget box.
- Change the alignment of the images in your widget box.
- Preview how your gallery will look.
- Edit the photos in your gallery
- Click here to drag the photos to rearrange them.
- Click these arrows to move the image up or down one \spot.
- Click here to view a larger version of your image.
- Click here to edit the text that appears when a website visitor hovers over that image on the page.
- Open the image editor for that image.
- Remove that image from the gallery.
- Cancel changes you’ve made to the gallery.
- Save changes you’ve made to the gallery.
Columns
Located in: popular
This widget allows you to divide your page into two columns. You can also modify the margin size and column padding. Then, you can drag widgets into the columns you have created. This is the only way to place widgets side by side.
Button
Located in: popular
This lets you insert a button onto your page. You can choose the button display text, the link the button leads to, the margins, the alignment in your widget box, and the button size.
Line
Located in: popular
This lets you insert a line to divide content on your page. You can preview the line, choose the thickness, the style, the margins of the line widget box, and the color of the line.
Panel
Located in: popular
This creates a panel where you can place widgets to have a unique container look.
Presets
Here, you’ll find a variety of preset panels, with the preview for these presets displayed at right. You can also save your current changes to add it to “My Presets”.
Background
Choose your panel’s background colour. You can also choose a second colour to create a gradient, and then choose the gradient’s direction. Finally, you can decide to use a background image instead.
Border
This lets you modify the width, colour, and style of borders for your panel. You can either change all four borders simultaneously, or individually modify each of the four sides.
Corners
You can use this option to round your corners. The higher the radius values, the more rounded your corners will be. You can change the values individually, or use the slider at the bottom to change all four corners at once.
Shadow
Change if you have an outer shadow on your panel, and if so, how this shadow appears. It is split into outer and inner shadows. You can decide how many pixels the shadow goes in the x and y directions, the shadow’s width, the shadow’s opacity, and the shadow’s colour.
Spacing
Here, you can choose your padding, which adds space to the inside of your panel. You can also change the margins, which adds space outside of your panel. Finally, “Content Width” lets you choose the maximum inside width of your panel.
Fonts
You can change the colour of your headings, font, links, and link hovers. You can also modify the font size, or choose to inherit it from your template. Finally, you can decide on the font type using “Font Family”.
Store
Located in: popular, ecommerce
This service is only available if you wish to pay for it. It allows you a shopping cart, different language support, shipping integration, payment acceptance, and order/inventory management. For a guide on the customisation of your online store, follow the link here.
Map
Located in: popular
This lets you insert a map onto your web page. Just type in the address and hit the magnifying glass to search for the address. Then, you can modify your settings to change the height of the map. You can choose “edit” at any time to modify the address and height of your map widget.
YouTube
Located in: popular, media
This allows you to put a YouTube video on your site. You can search YouTube using keywords for a video of interest, or you can directly input a URL for the video of your choice. You are also given the option to edit the margins. You can change this using “Edit” at any time.
HTML
Located in: popular
This lets you input HTML code onto your webpage. You can use this to paste in a widget that someone else has made, or type in your own HTML code if you are familiar with how to do so. Your code will appear wherever you place the widget.
Form
Located in: popular, forms
This lets you input a form onto your web page. You can either use a pre-made contact form, or create a blank form. At the top, you will be prompted to “Add new field”, and will be provided with a dropdown from which you can choose the items you want on your list. Single line text adds a text field. Click on the label to change it. Email, phone, and URL fields are the same, but require the user to input the values in the proper format to submit the form. Multi-line text works the same as single-line, but gives the user more space to type in their answer. Multiple choice gives the user a series of radio buttons to choose from. You can change the label or any of the answer choices. You can also highlight an answer choice and click the red x to remove it. Finally, the bottom allows you to “+Add Choice” and input another line from which they can choose. Checkboxes works the same, but allows the user to select multiple answers. Choose from a list also works the same, but allows the user to select an option from a drop down list. Finally, you can input text or input a spam protector (an image that the user must type in a box in order to approve their form submission). Anything inserted can be dragged to switch the order. You can also change the button’s text by hovering over it and typing in something new at right. You can change the heading of the form by clicking on the bold text at the top. Finally, you can change your form’s settings by switching to the settings tab. This allows you to change which email gets the form submissions, and the form completion message that appears once a user has submitted the form successfully.
Tumblr
Located in: media
This lets you add a Tumblr feed to your site by inserting a Tumblr user name. Edit will let you change the Tumblr user displayed, the layout, and the maximum number of displayed results. With properties, you can change the margins, alignment, date format, display title/description/caption/date, and whether or not the links are opened in new windows.
MP3
Located in: media
This lets you add a download to an MP3 file on your page. It takes you to your files, and will only select you choose ones in the proper format.
File
Located in: media
This lets you add a download to a file on your page. It takes you to all of your file uploads, and you can select one in any format that you want. You can use edit to change the file at any time, and to change where the download link is aligned in the widget box.
Flash
Located in: media
This lets you add a Flash file on your page. It takes you to your files, and will only let you choose SWF files.
Flickr
Located in: media
This lets you insert a Flickr feed. You can choose to display results from a search phrase, or from a user email. You can also slide to select the maximum number of results, as well as the number of columns. Finally, you can choose the size of the icon, and whether or not the icon is framed.
Flickr Search
Located in: media
This lets you insert a Flickr feed as well, but in a different format. This shows a grid of icons stacked together, and you can’t choose how many columns the images are displayed in. You can, again, use a search phrase or a user email. You can also edit the margins and the alignment.
Metacafe Video
Located in: media
This lets you insert a Metacafe video to your page. You can input the Metacafe video URL. Selecting “Browse Metacafe” will open Metacafe in a new page, for you to search for a video of interest. Settings will also let you edit the margins and alignment of the Widget.
Google AdSense
Located in: ecommerce
This lets you paste in your Google AdSense code. You can sign up for Google AdSense here, or find out more about it here. It provides an additional form of revenue for your page by allowing others to advertise on it.
PayPal Catalog
Located in: ecommerce
This lets you advertise products you are offering others to purchase via your PayPal account. This requires you to input a PayPal Premier or Business account. You can edit the margins and the currency your products are displayed with. Choosing “Add Product” lets you input something that people can then purchase through your PayPal account. You can give it a product title, price, description, and image. Once you’ve added a product, you can edit or delete it at any time under the “Products” listing, or drag them around to rearrange the order in which they are displayed in your widget.
Donation
Located in: ecommerce
This lets you request monetary donations on your page. You must provide a PayPal Premier or Business account to be able to accept donations. You can also edit the margins and alignment.
PayPal Product
Located in: ecommerce
This lets you display a PayPal product. It works the same as your PayPal catalog, but only lets you choose to display one item. The menu is the same as the “Add Product” menu.
Facebook Like
Located in: social
This allows users to “Like” your site on Facebook. If you select edit, you can modify your button’s margin, alignment, URL (the default is the page the button is on), the layout style (standard, button count, or box count), and width. You can choose whether or not the Facebook profile pictures are displayed of people who have liked your site. You can also choose the font and colour scheme (light or dark).
Facebook Comments
Located in: social
This allows user to add comments directly on your web page using their Facebook profiles. You can modify the margin, alignment, URL to comment on (the page it is on is the default), the number of posts to display by default, and the theme (light or dark, for white or black backgrounds).
Google+1
Located in: social
This allows users to share your page through Google+1. If you select edit, you can modify the button appearance, margin, alignment, language, turn on count display (number of people who have shared with your button), and choose the URL the button is associated with (the page it is on is the default).
Share Me
Located in: social
This lets you display several social media icons simultaneously. It displays buttons for Twitter, Facebook, and Google+1. You can change the button style, margins, alignment, or URL the buttons are associated with.
Tweet This
Located in: social
This allows users to share your content via Twitter. If you select edit, you get a series of options tabs. Button lets you choose the layout, margins, and alignment. Tweet text lets you modify the text included in the tweet if someone chooses to use the share button. The default is the page’s title. URL lets you choose the page you want to share (the default being the page the button is on). Language lets you choose the button’s language as it appears on your website. Recommendations lets you recommend twitter accounts for people who share your content. This is useful for if you would like to recommend that the user then follow your own account on Twitter.
Mailing List
Located in: forms
This lets you create a mailing list that users can sign up for on your web page through Constant Contact. This service is priced at $20 or $45 a month, depending on the features you want to be available for your mailing list. You also are permitted a free 60 day trial. You use Constant Contact to create your email, add contacts, and view reports on how your emails were received. When you add the signup to your page, you choose the form title and the submit button text. You can also modify the margins and alignment with the Edit button.
Wufoo Form
Located in: forms
This lets you input a form code for forms created in Wufoo. You can use this site to create for, surveys, and invitations. You can get a form code here and learn more about using Wufoo here.
Location
This lets you input your location information. You can modify your address, change the map size, the zoom, the alignment, and whether or not a map is displayed at all. Your address will be displayed at left of the map showing the location.
Translate
Located in: misc.
This lets you present an option to translate your page in any language the user wants using Google Translate.
Style (7)
From here, you can modify the style of your site.
Figure 5: Style Menu
Change Template (1)
You can choose between “responsive”, “premium”, and “free”. If you click on one of these templates, you can view how your site will appear with that template. You can also revert back to how your page looked before by clicking on “Revert Template”. You cannot publish with a premium template without upgrading to a premium plan.
Designer (2)
This brings up the designer pane on the side.
Presets lets you choose the default font on your page.
Colours lets you change the colour for each section of your page. You can change: main header, navigation bar, navigation bar (selected item), navigation bar (hovered over), headers two through six, paragraph text, link text, hovered over links, and visited links. There is also a box to check if you don’t want a default colour associated with it.
Fonts lets you change the font associated with different individual components of you page. You can change: the navigation bar, main header, headers two through six, the paragraph text, link, and hovered over link. You can choose at the bottom to chancel all changes, revert to default settings, or save your changes.
Colors (3)
This brings you to the colours section of the style designer.
Fonts (4)
This brings you to the fonts section of the style designer
Heading (5)
This lets you modify the heading at the top of your page. You can also choose whether or not this heading is the same for all pages, or just the current one.
Banner (6)
This lets you modify the banner at the top of your page. It will take you to your “My Files” page and ask you to choose an image for the banner.
Background (7)
This brings up the style designer again, but with the background option available. You can either choose a colour, or select a background image by clicking on “Edit” after clicking on the square next to “background”.
CSS (8)
This lets you modify the cascading style sheets for your page. You can choose to override your defaults, which get turned off when you select a style using the style designer. From here, you can also preview your CSS changes, as well as modify the site CSS and HTML. You can only modify CSS with a paid plan, and it is not recommended for people unfamiliar with HTML.
Page (8)
This lets you manage and modify the pages on your site.

Figure 6: Pages Menu
- Navigate between the different pages on your site.
- Add a new page. This will prompt you to name the page, choose the header displayed, and choose whether or not it is displayed in the navigation menu.
- Rename your current page. You cannot rename your home “index” page.
- Reload the page you are currently on.
- Delete your current page.
- Bring up the style designer for this page.
- Change the page heading. You can also choose whether or not this heading is then applied to all pages.
- Upload a custom banner to your site.
- Change your page’s background. This brings up the style editor again.
- Change your metadata. You can change the heading, the title (shown in the browser tab), the description (shown under your site link in search engines) and keywords (for search engines to be able to find your site). For more information about metadata, go here.
- Copy your page. This creates a new page in your site with the same layout and content. You can change the name and heading.
- Change from a variety of page layouts. This lets you segment your page into different sections to which you can add content.
Settings (9)
Settings is divided into four different segments.
Properties
In properties, you can change your favicon. This appears next to your website name in browser tabs or in bookmarked lists. You can also set up your password protection, which will be the password that users need to access your webpage. You can choose to lock all or unlock all pages when you set your password, or select which pages individually that you want locked. You can also change your site’s name and language.
Contacts
If you have a business, you can use this tab to modify your contact information. Every place contact information is displayed on your site will have this information. You can modify your business hours, location, and phone number.
Tracking
Here, you can change the header and footer codes of your page to implement tracking coding. You can also input your Google analytics ID or Webmaster code. This allows you to track traffic to your website.
Publishing
From here, you can choose to publish your site if you haven’t done so already. Note that you will have to choose your domain before you publish your site. If you have published your site, it will show you your domain, when you last published, and give you the options to un-publish or delete your site. You can also purchase custom domains from this page, or add domains you have registered elsewhere. Finally, you can choose to display or not display the www. Prefix, enable or disable SSL, and connect with Facebook in order to publish your website to Facebook.
SEO (10)
This tab lets you manage your search engine optimization, so that search engines can find your site more easily. This option is only available with paid plans. To learn more about SEO and why you may want this feature, you can head here.
Navigation (11)
This allows you to modify your navigation menu. You can drag your current pages to rearrange their order in the bar. You can also create a new page from here. Finally, each page will give you the option to add an item to a submenu of another page, hiding the page from the navigation bar, password protecting the page, editing the page (its label and hover text on the navigation bar), renaming the page, and deleting the page.
Files (12)
This lets you manage the files you have already uploaded. You can create new folders, upload new files, or search through your currently uploaded files. You can also edit uploaded images from here.
Menus
There are two different menus for Yola. You can access a menu from the SiteBuilder on your page, or you can access your “My Yola” navigation.
SiteBuilder Menu
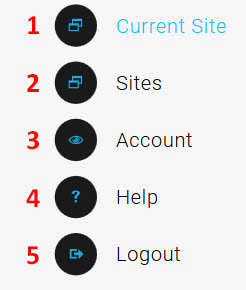
Figure 7: SiteBuilder Menu
Current Site (1)
This allows you to access SiteBuilder to modify your site, Analytics to modify the number of visitors to your page, domains for your page, the store for your page, and the traffic builder (available with Yola Gold only). With the gear, you can also access your publishing settings from this page. Clicking on the URL displayed will also open a new tab with the live version of your site.
Sites (2)
This lets you view the websites associated with this Yola account. From here, if you click on the website name, it will take you to that site. You can also view their published status, as well as add a new site.
Account (3)
From here, you can access your Yola dashboard, Yola Mail options (if you pay for this service), Store options (if you pay for this service), profile for your account (name, email, and location), payment methods (for paying for your Yola premium plans), pricing (the cost of the different premium plans), and language (for your account).
Help (4)
This brings you to the Yola support page. You can type in your question, view various tutorials, and view frequently asked questions.
Log Out (5)
This lets you log out of your current account.
Dashboard Menu
You can reach this by either using the menu above, or going to Yola.com and selecting “Go to My Yola”.
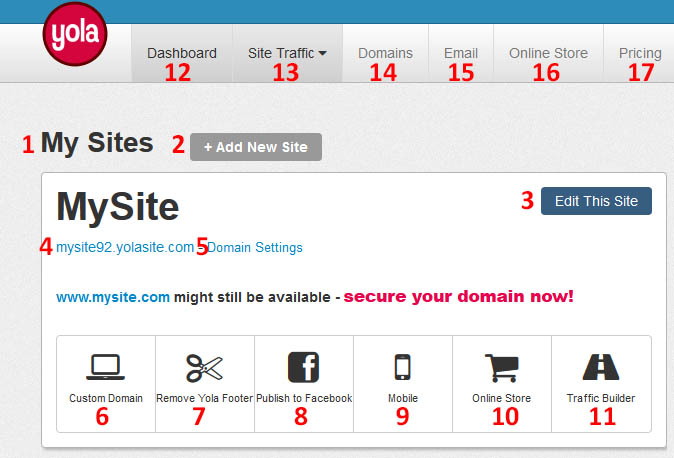
Figure 8: Dashboard
- All sites for your account are listed under here.
- Choose this option to add a new site to your account.
- Edit this site. Brings up SiteBuilder.
- Visit a live version of your page.
- View domain settings. Brings you to the Publishing settings page of your site.
- Get a custom domain. Brings you to the purchasing options for a custom domain for your site.
- Remove Yola footer. Brings you to the purchasing options for Yola paid plans.
- Publish to Facebook. Only available with premium plans.
- Create a mobile friendly version of your website. Only available with premium plans.
- Brings you to the store options for your page, or the payment options to create a store for your page.
- Brings you to the traffic builder for your page, if you have a Yola Gold plan, or the option to purchase Yola Gold if you do not.
- Brings you back to the dashboard.
- Lets you view various tools for site traffic (analytics, traffic builder, or SiteWit).
- Lets you manage domains.
- Lets you manage Yola Mail.
- Lets you manage your online store.
- Lets you view pricing for paid plans.
Summary
Overall, Yola offers an easy to use website builder that is very intuitive and allows you to create a side variety of websites. However, the options you have for modifying your page are a bit limited, and the paid plans don’t include as many features as other websites (for example, paying extra for an online store or a mailbox even if you have a paid plan). There is also no option for creating a blog for your page. But if you’re looking for a relatively easy to use website builder that lets you make a nice page, Yola is a good choice.
For more support, you can go to https://www.yola.com/support to type in a question of interest or send a message about an issue to https://www.yola.com/support/contact. You can also go to https://www.yola.com/tutorials to look up tutorials for specific things that you would like to do on your web page.