 Connect
WordPress.com Website Builder Guide
Introduction
WordPress is a great website with a lot of versatility. This makes it not only good for the average individual looking to start a personal website or blog, but also makes it good for business professionals looking to create a great website for their brand. Here, we will go over the basics of making a WordPress website, as well as the unique features this option has to offer.
There are three possible WordPress plans, each of which are priced accordingly. Essentially, the more you pay, the more features you get on the website. However, not everyone will need all features, and so it is up to you to decide which plan best fits your needs as well as your budget.
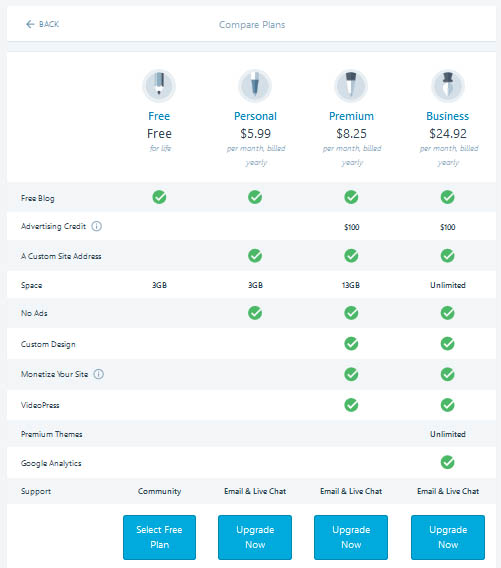
Figure 1: Plan Options
It is important to note that although the prices are listed as monthly, you are billed for a year’s worth of website usage at once. Therefore, the personal plan will cost you $71.88, the premium plan will cost you $99, and the business plan will cost you $299.04, to be paid all at once each year. The free plan is probably sufficient for a person looking to create their own personal website or blog, if they don’t mind the WordPress subdomain (your website will appear as YourWebsite.WordPress.com), or if they would like a slightly more legitimate option, the personal plan is a great choice (with this plan, you get a custom site address and no ads). For more professional web pages, I would recommend at least paying for a domain name. With premium, you are now able to customize design the “themes” on your page, you can place ads that can provide additional income, you can add videos, and you receive credit to advertise your website. With the business plan, you get the addition of Google Analytics and premium themes. It is up to each individual to determine the cost-benefit analysis of each of these plan options.
Once you’ve made a decision, it’s time to create your website!
Getting Started
To begin creating a website, head over to WordPress.com and choose “Create Website”. The first step is to choose what your website is about, and WordPress will try to cater the creation process to that theme. Each menu option has a sub-menu, where you can be even more specific about the type of website you wish to create.
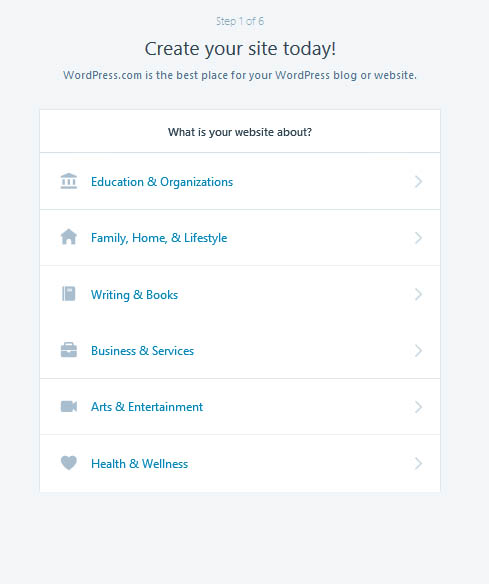
Figure 2: Choosing your page’s purpose
Once you make a decision, it will ask you to choose the type of layout you want for your home page. The options of “a list of my latest posts” and “a grid of my latest posts” are better for personal websites, while “a welcome page for my site” is better for professional websites.
The next page lets you choose a theme. If you choose a theme now, you can always change it later. However, you can also choose to skip choosing a theme at this moment by scrolling to the very bottom of the page. Now, the choices they give you are ones that should match the type of website you wish to create, and if you don’t have much of a preference you can pick one right now. However, I recommend scrolling to the bottom and choosing “skip for now”, because you will be presented with a wider variety of options later on in the website building process, and it wouldn’t make sense to stress over limited choices right now.
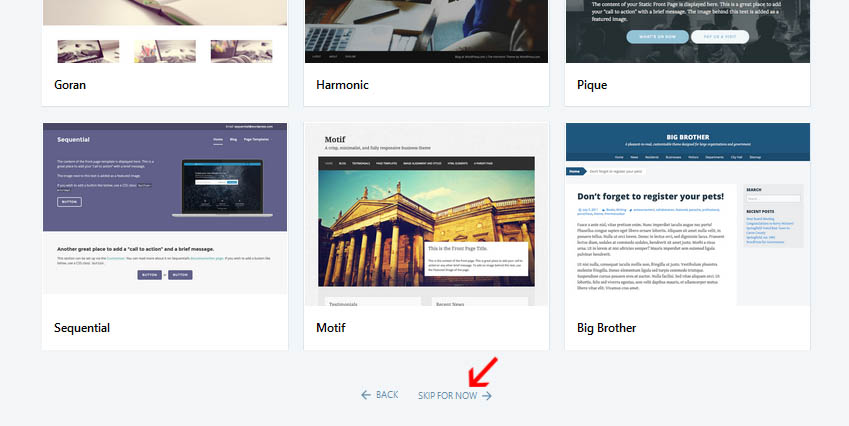
Figure 4: Choosing a theme
Now, you’ll be asked to choose your domain name. When you type in your desired website name, it will give you a list of options. The first one will always be the free option, which contains WebsiteName.Wordpress.com. If that name is not available, they will add numbers to the end of the website name (for example, WebsiteName227.Wordpress.com). This is not recommended, because it will make it more difficult for website users to type in your page name.
At this stage, you finally choose which plan you would like, as described above. Then, you choose your own username (typically the name of your web site), the email address you would like associated with the account, and a password. You will then be sent an email to that email address to confirm and activate your website. Once this is done, you are ready to start customising your web page.
Main Menu
Here’s a quick view of your main menu:
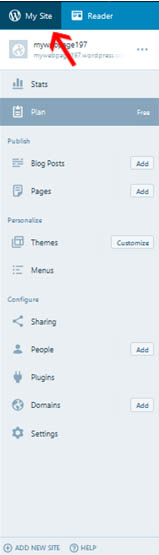
Figure 5: Menu view (on left handed side of page)
If you ever get lost, click “My Site” in the top left corner (indicated with arrow), and it will return you to this menu.
Let’s cover each of these menu pages in turn.
Web Page Overview
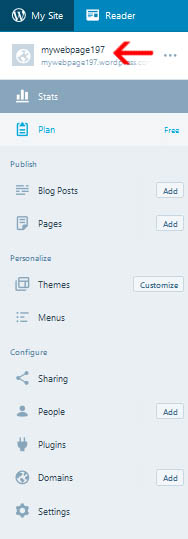
Figure 6: Web Page Overview Link
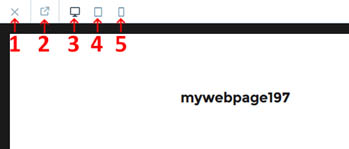
Figure 7: Web Page View Menu
When we click on this link, we can view our web page the same way others will view it, including active links. On top, we can choose which format style in which to view our web page. The options are:
- close web page overview
- open new window
- desktop view
- tablet view
- phone view
This way, you can see how your website will display on these different devices and make sure the page layout is to your liking on each of these devices.
Stats
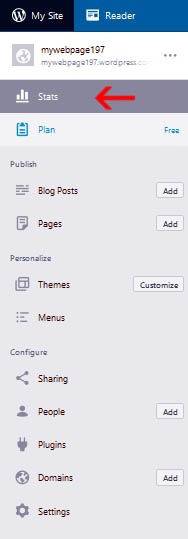
Figure 8: Stats Menu
When you click on this link, you can see the statistics for your web page. The top contains a map that indicates days in months that you post more or less frequently. Following that, there are stats on visitors to the web page. First, it shows the views, likes, and comments on the current post. Then, it shows this information as well as number of visitors for today’s date. Next, it lists how many overall posts, views, and visitors you have had, as well as the number of visitors on your busiest day. Following is a breakdown of the days of the week and times of the day you tend to get most of your viewers. At the end is an option to change your domain address to a paid option. Then you have comments posted, tags/categories of your posts, followers, and “publicise” followers (followers on social media).
Plan
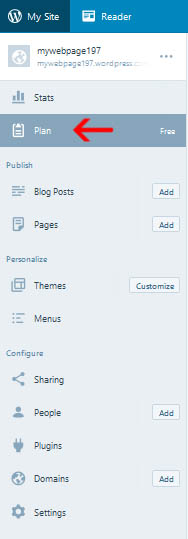
Figure 9: Plan menu
This tab simply allows us the option to change our WordPress plan (between free, personal, premium, and business), as discussed earlier.
Personalize
These sections (blog posts and pages) allow you to add content to your web page. We will discuss these in-depth later on, but just remember you can always choose these selections from the main menu.
Themes
This page allows you to choose the theme for your page, which is essentially the layout and aesthetics. First, at the top, it will show you your current theme choice. It will then allow you to customise or view information about your current theme. It also displays all of the possible themes you can have on your web site. In the search bar, you can search for a specific theme, and you can choose to only display free or premium themes. If you have a free or personal account, some of these themes (the premium themes) will cost money, but they are free if you have a business account. The more you scroll down the page, the more options you will see.
If you click on any of these screens, it will provide you with an overview of the theme with some information about it. The information provided will vary based on the theme, but it will include things like where the menus are and where the widgets can be placed. In addition, it will always list the specs of the theme and the various features it offers.
There is also a link for support, which allows you to visit forums for either extra help specific to that theme, or forums for CSS help (which is if you want to add in some coding to your theme).
If, instead of choosing the theme, you click the ellipse in the theme’s bottom right corner, you get a list of options. Live Demo allows you to see what your website would look like with that theme. Activate or Purchase sets this theme as your new theme. Try & Customise acts like a live demo but also gives you a page customisation side bar. And again, similar to when you click on the theme itself, you get options for info and support.
In addition, paid themes offer a setup option, which provides you with a more in-depth guide of how to set up your page using the theme.
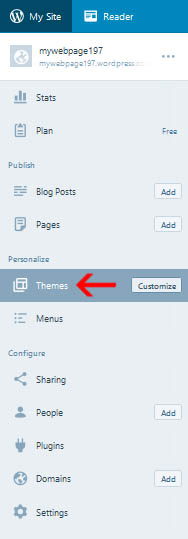
Figure 10: Themes menu
From themes, you can also choose to customise your current theme by either pressing customise on the left hand menu, or by pressing customise at the top right of the themes page. If you choose customise, you get a new menu of choices:
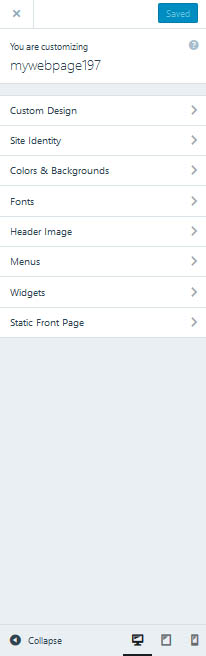
Figure 11: Customisation menu
To the right, you will see a live preview of your web page, with various pencil icons. The pencil icons simply serve to take you to the direct sub-menu under customisation that affects that feature on your page. To find out what those pages are, we’re going to cover each of the options in the above sub-menu, but remember you can always use these short cuts.
The first option allows you to customise the theme. Some of the options are only available to premium and above users, although you are allowed to try them to see if you think you might be interested in upgrading plans.
If you choose this option, you get a custom design menu. Only the options indicated by an open circle are the premium options.
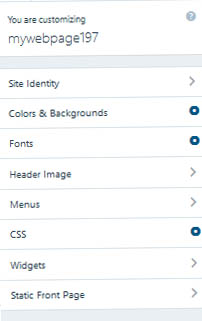
Figure 12: Custom Design menu
Site Identity
Choosing this option allows you to choose a custom site titles and footers, as shown below.
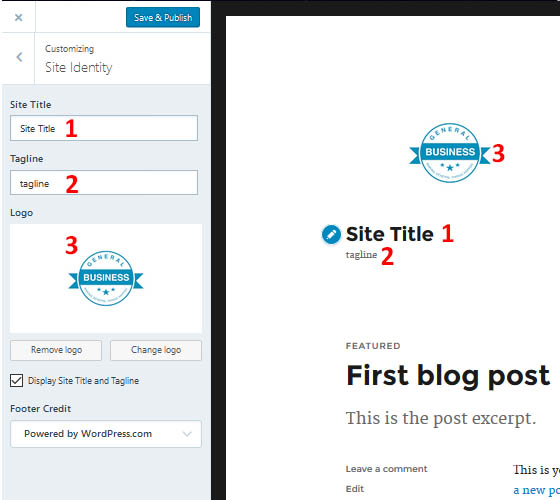
Figure 13: Site Identity options
It allows you to set a logo which appears above the page (3), a site title (1), and a tagline (2) for beneath the title. All of these are optional and can be removed (choosing remove logo or unchecking the box for “display site title and tagline”).
You can also modify the footer credit.
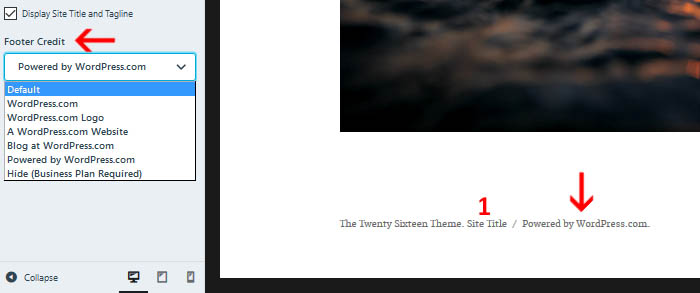
Figure 14: Footer credit
As you can see from the indicative arrows, the footer credit will modify what appears after your site title at the bottom of the page. If you have a business plan, you can also remove this WordPress credit. Your site title appears in the footer as well.
Colors and Backgrounds – Premium Only

Figure 15: Colours and Backgrounds menu
Background will allow you to choose a background colour for your page. Depending on the theme, this may change the entire background, or may just change the border around your page. WordPress will provide you with colours that work well with your current colour palette, but will also give you the freedom to choose any colour you wish by clicking on “pick your own colour”. It will also give you the option to select an image for your background. So if you would like to create something more complicated as a background, you can create it as an image and then upload it to WordPress here.
Colours will give you the current colour palette of the theme. Each theme uses the colours for different purposes. The best way to figure out what each colour corresponds to is to select and change it. If you click on the circle with that colour it will (like background) give you suggested colours for your palette, or allow you to choose your own colour.
Choose a Palette will give you various colour palette options for your theme. Don’t do this after changing the background or colours yourself, or you’ll lose all of your progress. It provides a simple way to change up your page with colours that are complementary to one another. There are options to scroll through the palettes with “more” and “back” buttons.
Pick a Background Pattern essentially is a collection of pre-made images to which you can change your background. This, too, has a wide variety of options that you can scroll through with “more” and “back” buttons.
Fonts – Premium only
This allows you to choose different fonts for the headings and base posts, as well as different sizes (tiny, small, normal, large, and huge).
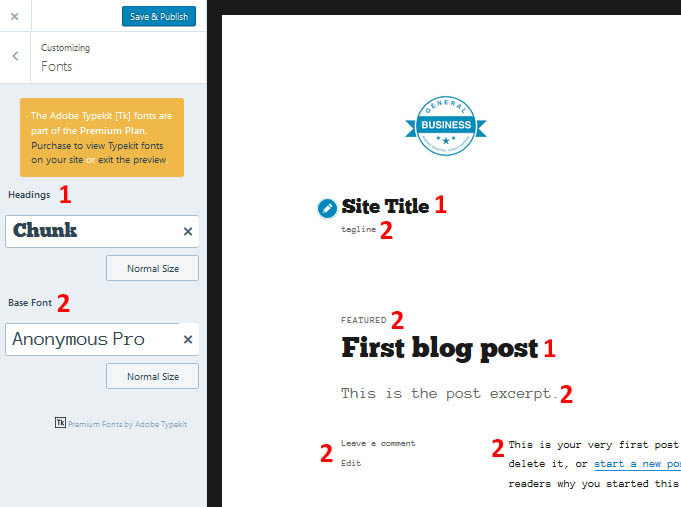
Figure 16: Fonts
All 1’s have the headings font, and all 2’s have the base font.
Header Image
This allows you to choose a header for your web page. Once you select an image as the header, you can crop it to your liking before adding it to the page. The recommended header size is 1200 x 280, but this is not required.
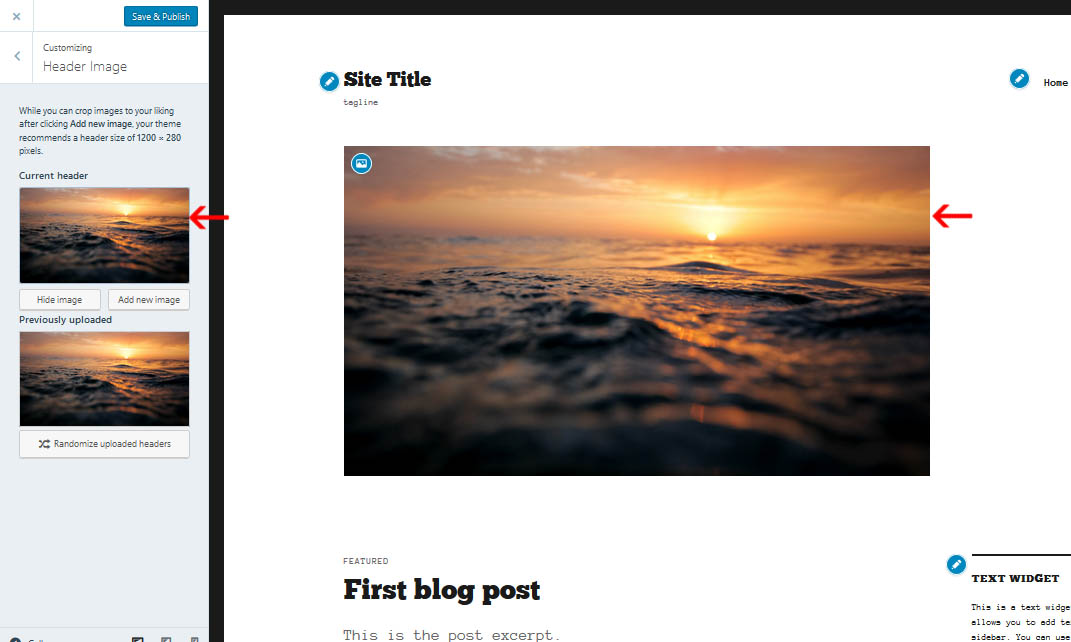
Figure 17: Header menu and location on page
Menus
This lets you choose what menus on your page go where. Each theme will have a different situation. In this theme’s case, it allows you to have two menus in predetermined locations, and then lets you choose what menu you would like to go in each location. This theme came preloaded with “primary” and “social links” menu types, but you can add a menu type by choosing “+ add menu”. This takes you to a page that allows you to customise any of your menus, old and new. On the customisation page, the first line lets you choose a name for this menu type. Then, there are a list of items and an option at the end to add more. You can also choose to change the order of the items in the menu bar at any time. Within each item there are also a variety of options. URL lets you choose the link that menu item will lead to. Navigation Label is how that item will appear on your menu bar. There is a check box to have clicking that link open it in a new window (this option is good for external web pages you link to, but bad for linking to pages on your own site). Title Attribute allows you to change what shows up when you mouse over your link. If you leave it empty, it will just display the URL. CSS Classes are a bit more complicated, and require working knowledge of HTML. If you would like to learn more about using this feature, you can follow this link. Link Relationship XFN allows you to define the human relationship you have to the person you are linking to. This can be anything from “colleague” to “spouse”. For more information about these relationships, follow this link. Description appears on your page to tell the person more about the link. Not all themes support this option, and so sometimes nothing will change when you fill out this option. Finally, you have the option to automatically add new top-level pages to this menu. That means that, when creating different web pages, if you had one that is at the top of the hierarchy of pages (for example, a new page you deem the home page), then it would automatically add this to the menu you are currently modifying. This would be good for when you want menus on other pages to always be able to link back to the home page.

Figure 18: Menu options and where each one appears on the page
CSS – Premium only
This allows the option to modify your page with CSS. Unless you are already familiar with HTML and CSS, I would not recommend using this feature. For more information on CSS in WordPress, see this link. It is important to note that if you change themes later on, it will erase all of your CSS work, so make sure to save it somewhere if you plan on switching themes sometime soon.
Widgets
This allows you to modify your widgets. The first menu will be a selection of different areas of your web site that can contain widgets. When you choose a location, you then get a list of widgets in that location, as well as an option to add another widget, and to reorder your current widgets. When you choose to add a widget, it shows you a list of all of the possible widgets you can add to your page. Each widget has its own individual options. We’ll cover widgets later on in detail, but just know that you can modify them here using this tab.
Static Front Page
Finally, you can choose what you want to be your front page. Your options are to either display your latest posts, or display a static welcome page. If you choose static page, you are then asked which of the pages you have created you would like to be the front page. You will also be asked which of the pages you have created you would like to be the posts page.
Menus
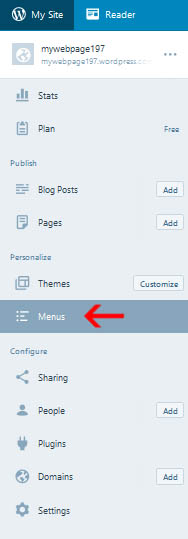
Figure 19: Menus page
This page allows you to modify the menu pages on your site. It’s fairly similar to the menu page in the themes customisation menu, but with a different layout.

Figure 20: Menu page options
You choose 1 to decide which menu location you want to focus on, and 2 to determine which menu type you want to put there. Then, those menu options become available at the bottom for modification. Choosing the trash can (3) will throw out that menu type. The pencil (5) lets you modify that menu option, and the + (6) allows you to add a new menu option. Then, you can save these changes using 4.
Otherwise, everything is the same as the menu page discussed in the personalisation menu.
Sharing
This page allows you to connect any social media accounts to your web page. Your options are: Facebook, Twitter, Google +, LinkedIn, Tumblr, Path, and Eventbrite. When you select connect, it automatically opens a new window with your different accounts for that web site. You will need to sign in and authorize the app before you can select it to be connected.
You can also choose to change your “sharing buttons”.
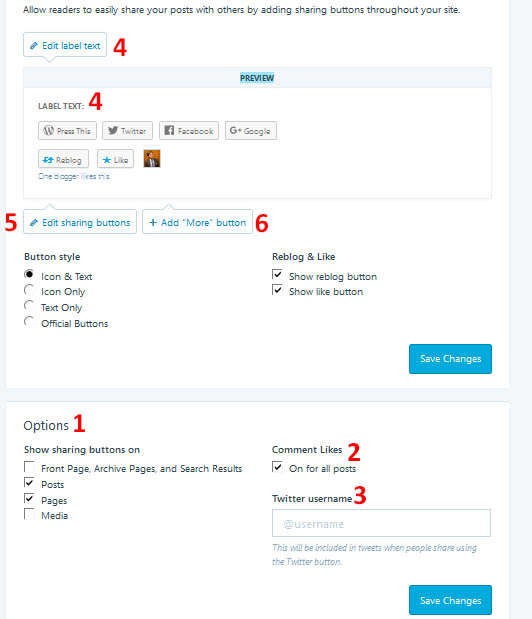
Figure 21: Sharing Buttons
These appear on various locations throughout your site, chosen by options (1). You can also allow Facebook “Likes” (2), and you can add a Twitter username so that you are mentioned when someone tweets about your page (3). The label text is how your buttons for sharing are presented (4). Then, you can choose to edit your sharing buttons (5). Click on the buttons you wish to include, and they will gray out if they are selected. You can reorder the buttons. You can also include a more button (+). When you have a more button, the reader can select this in order to get more sharing options in a dropdown list that you don’t want displayed individually. Again, you select which buttons you wish to appear in the “more” menu by clicking on them. You can also choose the button style for these sharing buttons. Icon & Text gives you the website logo and the name of the site. Then there are Icon Only and Text Only choices for the buttons, using only the website logo or only the word on the buttons. Finally, you can choose official buttons, which, for example, would be the generic Facebook “share” button and the generic Twitter “re-tweet” button designed by the creators of those websites. You can also decide whether or not to include a re-blog and like button, which are for other WordPress users to use.
People

Figure 22: People page
This allows you to add a team that can also access your web page and modify it, as well as invite people to follow your web page. Using “Add” or “+ person” buttons let you invite a user. You can enter multiple email addresses and/or WordPress usernames. If they are not WordPress users, they will be instructed to make an account. You can choose a role for the person or people you are emailing, and can enter a message that will be sent with the invitation. The roles are as follows:
Administration: They have as much power as you do for the web page. For example, they can make administrators, add users, and change roles, as well as change themes and settings. Be very careful with who you grant this role to!
Editor: They have access to all posts, pages, comments, categories, tags, and links.
Author: They can write posts, upload photos to these posts, publish these posts, and edit them.
Contributor: They can write and edit posts, but cannot publish them.
Follower/Viewer: They can read and comment on the pages. Viewers are only for private sites, where only those invited are able to view the page.
The people who have access to the page are listed under “Team”. Each member and their role will be listed here. The “Followers” tab lists all of the followers of your page, and you can choose to remove any of them. Finally, you can use “Email Followers” to send a message to all of your followers at once.
Plugins
Figure 23: Plugins page
This shows you the plugins available to your site based on your subscription plan, as well as the other plugins that are available with more advanced subscriptions. These are simply the various ways you use the website, like the customiser and stats, as well as other features that run in the background without your knowledge, like security scanning and anti-spam security. This is purely informative and cannot be deactivated. In addition, WordPress does not allow the addition of other plugins.
Domains
Figure 24: Domains page
This allows you to purchase other domains that also link to your website. For example, you could purchase webpagename.com and webpagename.org so they both link back to your web page.
Settings
This page has several tabs that allow you to change the settings for your web site.

Figure 25: Settings page
General
Site Title and Tagline are the same as described in the customisation screen. It changes the title above the page as well as the subheading beneath it. “Add a Custom Address” takes you back to the Domains page. Language is for your interface language as well as to indicate what language your page is written in. Finally, you can choose your site’s time zone, which is important for when the website timestamps your posts.
Writing
This allows you to choose a default category and format for your posts. In addition, you can enable markdown, which are ways of adding in HTML to your posts to do things like bold and italicise your text. For more information on types of markdowns, follow this link. It also allows you to add a “Press This” app to your browser by adding it to your favourites or bookmarks. You can use this app to save text, images, and videos when you are on a website and want to later add this content to your page.
Discussion
This section lets you change settings about discussions on your page. You can change article settings, comment settings (including whether or not they must be previously approved), and when the website should email you in relationship with interaction with your posts. You can also choose to require comments to be approved based on words contained in the comment (for example, if you wish to censor curse words), as well as requiring approval for certain IP addresses or e-mail addresses. Finally, you can also choose to blacklist words, e-mails, or IP addresses without the need for an approval process. In addition, you can require approval of comments that contain too many hyperlinks (as they are often spam).
Analytics
This page is for google analytics. Without a business plan, you cannot use it. Otherwise, you can put in your Google Analytics tracking ID, and it will give you various website analysis information on your website popularity. If you want to learn more about Google Analytics on WordPress, follow this link.
SEO
This tab is for Search Engine Optimization. By default, all pages are optimised for search engines Google, Bing, Pinterest, and Yandex. You can also use the “Front Page Meta Description” to change the page description on these search engines.
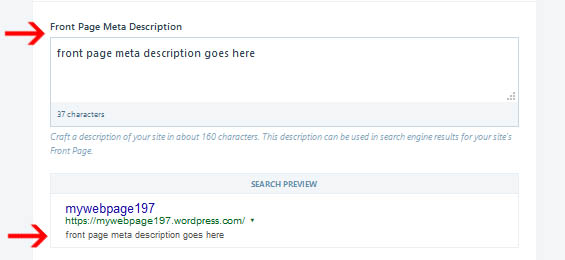
Figure 26: How front page meta description gets displayed
You can also choose site verification services. Typically, your website is indexed by these search engine without these options, and this tool should only be used by advanced programmers. For more information on using this service, follow this link. At the bottom, it also presents you with a link to your sitemap.
Import
This is used to import another site’s content to your page. You do this using a WordPress export file. If you require this service, you can use WordPress’s import guide.
Export
This creates the WordPress export file mentioned above. You can either export your entire website, or you can choose specific content. You can choose posts, pages, or feedback (for example, results of a survey you posted). For posts and pages, you can specify only posts by a certain author, a certain status, or a certain start/end date. For posts, you can also choose only a certain category. You then choose export selected content.
Adding Content
Blog Posts
To add a blog post to your page (or just a post, if you don’t have a blog but still want to make posts on your page), head to that page using the side bar.
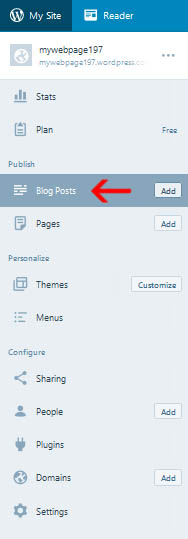
Figure 27: Blog Post Page
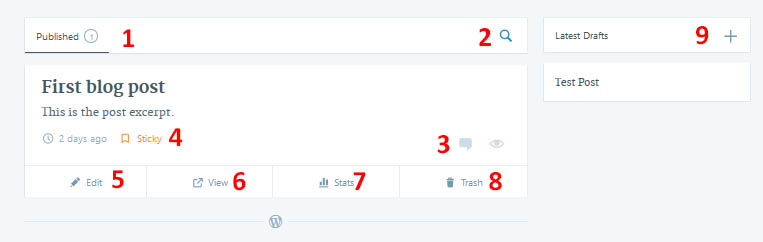
Figure 28: Blog Posts Information
When you select “Blog Posts”, it shows you your published posts, from most recent to oldest (1). It also provides you with a search bar to look for specific posts (2). Each post will list comments and total views (3). It also gives you the option to “sticky” a post, which means that this post will always appear at the top of your page. This feature is best for an introduction post that you would like people to read before continuing on with the page. This page also presents you with the options for each post to edit it (5), view the post in a new window to see how others will view it (6), view the post’s stats (7), or delete the post (8). It will also show you current drafts you are working on in the side bar (9).
In order to create a new post, you will select add (on the side menu) or + (on the draft area). This will take you to the new post page. The page will appear when you’re editing a post.
Features:
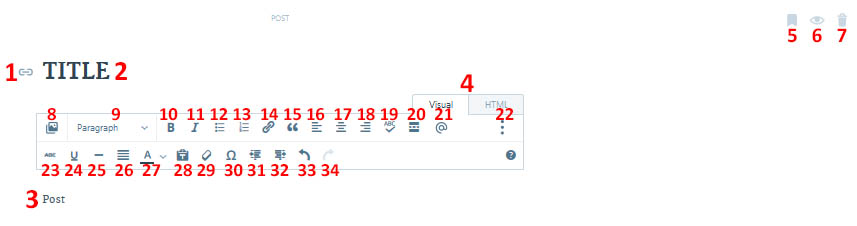
Figure 29: Keyboard shortcuts for post editing
- Edit Post URL: It allows you to view the current URL for the post and copy it. The format of your URL will be websitename.com/year/month/day/Title
- Title: Allows you to change the title of the post, and consequently, the URL.
- Post: Where you type in what you wish to post.
- Allows you to toggle between Visual and HTML options. If you know how to use HTML and would like to use these tags to modify your page instead of the WordPress buttons, you would toggle this on instead.
- Mark as a sticky so it stays at the top of all of your pages.
- Edit the visibility to be public, private, or password protected.
- Send the post to the trash.
- Add media. You can choose to add from your documents on your computer (“Add New”) or add via URL. This simply adds files to your account. Then, you select one and choose “Insert” if you wish to put that file into your post. You can upload images and documents in any plan, and video and audio in premium and business plans. If you would like to modify a file you have already uploaded, hover over it and choose the pencil to edit. Here, you can choose to write a caption, alt text (for images), and a description, as well as view the URL associated with this file on your page. It will also give you various descriptions of the file (name, type, dimensions, and upload date). There is also a delete option in the bottom left corner of the editing screen. At the very bottom of the page, it tells you what percentage of your total gigabytes of storage you have used. If you are running out of space, you can delete files for more space.
- Change the text style. Your options are paragraph, headings 1-6 (a higher number is a smaller heading), and pre-formatted (which is formatted based on the theme you have chosen). It will always change the entire line of text where your cursor is located. You can highlight multiple lines if you wish to change more than one at a time.
- Turn on bold Either highlight some text to change it to bold, or start typing after the button is pressed to turn all font bold. Click the button again to turn it off.
- Turn on italicized This works the same as above.
- Bulleted list. If you have highlighted several lines of text, or if you have your cursor next to a line of text, and you press this button, it will bullet the line(s). If you press this button while next to an empty line, it will place a bullet there. If you type text next to the bullet and press enter, another bullet will appear on the next line. To turn off the bullets, or to make them disappear, press the button again next to a line that has a bullet.
- Numbered list. Same as above, but with increasing numerical order. You can also change a bulleted list to a numerical list by pressing this button.
- Insert/Edit Link. You can insert any URL you want, and then choose the text the link will be displayed as by changing the “Link Text”. You can also choose to have this link automatically open in a new window/tab. Finally, you will see a list of choices to link to content you have on your own page. When you are ready, click “Add Link”.
- Block quote. This will add shaded box, which is meant to be for any long quotes from other sources. Pressing enter in the box will extend the block quote. To exit block quote, or to remove a block quote, press the button again and it will remove that line from block quote format.
- Align left. Moves the whole line to the left of the post.
- Align centre. Moves the whole line to the centre of the post.
- Align right. Moves the whole line to the right of the post.
- Proofreading writing. When on, it allows you to select red underlined text and see spelling suggestions. You can also choose to ignore the suggestion or to always ignore this suggestion. Press again to turn off proofreading mode.
- Insert read more tag. This inserts a dotted line. Above that line is the text that appears on your page, which should be used for the introduction or post summary. Then a “read more” button appears where you inserted the line. It allows the reader to click a link to the full article. If this option is not in place, the entire post will appear within the post page.
- Add Contact Form. When you choose this option, it shows you the default form fields. You can choose the trash can to remove any of the default fields. The pencil allows you to edit these fields. You can also choose “add new field” to insert a new field. When you add or edit, it presents you with the “Field Label”, “Field Type”, and whether or not it is a required section of the contact form. Field type includes checkbox, dropdown, email address, name, radio button, text, text area, or web address. If you choose dropdown or radio button, it will give you a field to enter new options. You can delete the different options with the “x”, and you can type a new option in the text area and press enter to add it to the list. Then, you choose insert to put all of the contact fields into your post. There is also a settings tab at the top of the contact form page, where you can enter one or more email addresses and a subject line. This will send the form to the email you choose with the subject line you choose. If you enter no email(s) or subject, it sends the form to the post author and the subject line is the post title.
- Toggle advanced. The second line only appears when this is toggled on.
- Turn on strikethrough Either highlight some text to change it to strikethrough, or start typing after the button is pressed to turn all font strikethrough. Click this button again to turn it off.
- Turn on underline Same as above.
- Add a horizontal line to your post where your cursor currently is. If the line has text, and you place the cursor at the front, the line will go above the text. If you are in the middle of a line of text, it will put a break there with no line. If you are at the end of a line of text, it will place the line below the text.
- Aligns all highlighted text to the left hand side of the post.
- Text colour. Changes highlighted text colour, or turns all new text that you type after pressing the button that colour. It gives you a list of colour options, and then allows you to choose custom colours. All recent custom colours will be added to the bottom of the colour palette.
- Paste as text. When turned on, will only paste content as plain text. For example, if you try to paste something that has bolds and italics in it, it will just paste the plain text without this formatting. This option can be turned on or off at any time.
- Clear formatting. If you highlight some text, it will remove all formatting it has received. So if you highlight text that is bolded, it will turn it back into normal text.
- Special characters. Gives a library of special characters. These include mathematics symbols, currency, Greek letters, accented letters, and more. You then click on the one you’re interested in inserting.
- Decrease indent. Steps the indented text back one “tab” value. Moves the entire line of text.
- Increase indent. Steps the text forward one “tab” value. Moves the entire line of text.
- Undo last modification event.
- Redo last modification event.
After modifying the text in visual, you can see the current HTML state as well by choosing the HTML tag.
There are also a series of keyboard shortcuts that you can use to achieve the same effect for more efficient use.
You can save your post at any time as a draft. It also automatically saves your draft while you’re working. When you’re done, there are also a variety of options on the left hand menu for publishing your post.
Categories & Tags allows you to use custom categories to group your posts by topic, and custom tags to associate keywords with posts. You can add a new category name, and then decide if it is a parent or sub-category, or you can add it to a previously created category. You can add tags by typing your keyword(s) into the “tags” box and pressing enter. Remove tags by selecting “x”.
Featured Image allows you to choose an image associated with your post. Use this for the image that best represents your post.
Sharing allows you to choose which social media you wish to share the post with. Only ones you have already connected by using the “Sharing” menu described above will appear. You can get to the sharing page by choosing “connect new service”. It also allows you to choose whether or not to enable sharing and like buttons on this post.
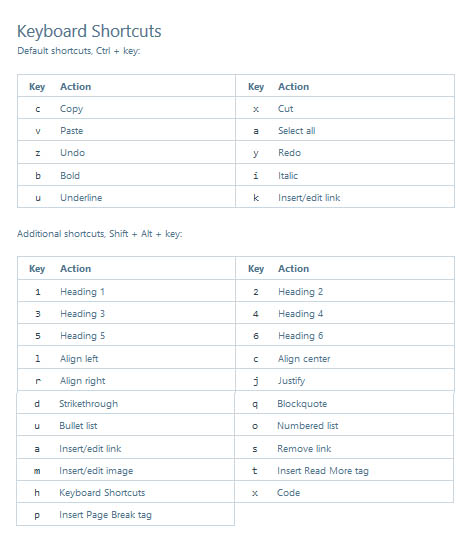
Figure 30: Side post editing menu
Post Format allows you to choose the format of your post. Standard is the default. There is also Aside, Image, Video, Quote, Link, Gallery, Status, Audio, and Chat. Choose the one that makes the most sense for you.
More Options
Choose a slug: if you have a really long title, and want to give the URL a simpler one for a visitor to type in, you would change the slug. For example, if your title is “Title of My Post”, and your slug is “short title”, then the URL would be changed from websitename.com/year/month/day/Title-of-My-Post to websitename.com/year/month/day/Short-Title.
Choose an excerpt: This is a summary of the post. For example, if you set your main page to only display excerpts of your post along with the title and a link to that post, this is where this information would appear. Therefore, you won’t always need a post excerpt.
Location: Where you are posting from. You can either search for one, or choose “get current location”.
Discussion: You can choose to enable or disable comments, Pingbacks, and Tracebacks.
Publishing
Once you feel like you’re finished, you can publish your post. You can preview the post to see how it will be presented on your web site. You can publish the post immediately with “publish”, or you can choose the rectangle in order to set it to be published at a future date and time. This is handy for if you write a bunch of posts at once, but want the content to be spread out over several days.
Pages
To add a new page to your site, head to that location on your side menu.
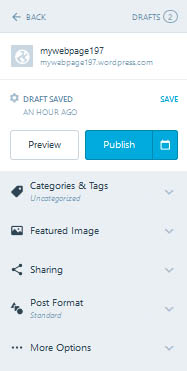
Figure 31: Pages
When you go to the pages area, it lets you choose between published pages, drafts, scheduled pages, and trashed pages. If you click on the name of a page, it will take you to the URL for that page. If you click on the ellipse next to a page, it will let you choose to view the page in a new tab, edit that page, or trash that page. There will also be a little house next to your home page, which cannot be deleted. When you choose to add or edit a new page, you get the exact same menu as you do for a post. So if you know how to make a blog post, you know how to format your new page! If you have a blog, you’ll want to only create new pages for very important things. The default pages provided are “About” and “Contact” pages. It also saves your drafts, and allows you to set a time to publish, just like in posts. You also get a search bar for your published pages like you do for published posts.
Widgets
The last thing you can add to your page is a widget. As discussed earlier, this is found in the “Customise” menu under “Themes”. The location of widgets is predetermined by your theme, but you can have multiple widgets in an area. For example, if a theme has a sidebar in a particular location, you can add several widgets to that single sidebar, or you can have none. Each widget in that area will be listed, and if you click on it, you will be given an option menu to change various aspects of that widget, as well as the option to remove it, or to change its visibility. You can set the visibility based on whether you want to only show it in some situations, or only hide it in some situations. Then, you can choose to base it on category, author, tag, date, page, or taxonomy. You can also have multiple conditionals on your page, and can add or delete them at any time. Finally, you can also change the title under which each widget appears, or choose not to display a title at all. You can also reorder the widgets in the area, or to add widgets to the area. When you add a widget, it will give you a list of all of the widgets available on WordPress.
Akismet Widget displays the number of spam comments your Akismet plugin has caught.
Archives displays a monthly archive of your posts. You can also choose to display it as a dropdown, and choose to display post counts.
Authors displays authors of your posts, as well as their WordPress icons. It lists underneath what posts that author has contributed, as well as a link to that author’s main WordPress page. You can choose how many posts to show for each author, and change the avatar size.
BandPage allows you to display content from a BandPage, if you have connected one.
Blogs I Follow shows linked images for the blogs your WordPress account follows. You can choose how many blogs to show (up to 50), and decide if you want to show this as a list or as a grid.
Blog Stats shows a hit counter for your blog. You can also decide what to name the hits (for example, hits, visitors, or fans).
Calendar shows a calendar of your site’s posts. Days with a post will appear filled in, and clicking on it will take you to the post(s) on that day.
Categories shows a dropdown list of categories you have posted under on your site. You can choose to display it as a dropdown, the number of posts in that category, and/or the post hierarchy.
Category Cloud shows your categories in “cloud” format, which means that more frequently used categories appear larger than less frequently used. It also allows you to choose how many categories to show, which categories to exclude (if any), and the minimum and maximum font percentages. Then, when you choose one on the page, it takes you to a page with all posts in that category.
Contact Info allows you to show your address (and a map, if desired), a phone, and your hours. This would primarily be used for a business.
Custom Menu allows you to add one of your previously created menus to this location.
Display WordPress Posts displays recent posts from other WordPress pages (or a blog with Jetpack). It requires you to insert the blog URL. It lets you choose the number of posts to display, whether you would like to open the blog’s link in a new tab, and whether or not to show featured images and excerpts from that blog.
EU Cookie Law Banner displays a banner warning that your site uses cookies, which is required by law in the European Union. You can decide when the banner gets hidden, what the banner says, the URL of the policy (provided for you), and the button text on the policy (to accept it).
Facebook Page Plugin connects users to your Facebook page. You must insert the URL of the Facebook page. It lets you choose the width and height of the plugin, if it shows your profile and cover photos, and it displays a stream of recent Facebook posts.
Flickr displays your recent posts on Flickr. You must insert the Flickr RSS URL. You can also choose the number of photos to display and the size of the photos.
Follow Blog adds an email signup to permit people to follow your blog. You can choose what appears for people who do not follow the blog, what appears to people who do follow the blog, what appears to logged-in WordPress users, and what the follow button text is. You can also choose whether or not to show how many followers your page has.
Gallery displays a photo gallery or slide show. You can choose which images you would like to be in the gallery, what the gallery links to (carousel, attachment page, and media file), whether or not to show them in a random order, and the style of the gallery (titles, square titles, circles, or slideshow).
Goodreads displays your books from Goodreads. You must insert your Goodreads user ID, and you can decide what to call the display shelf.
Gravatar inserts a Gravatar image. You can select a user already associated with this page, or enter a custom email address. You can choose the size, alignment, Gravatar link that the image takes you to, and the text displayed after the Gravatar.
Gravatar Profile displays a mini version of your Gravatar profile. Again, you can select a user or add a custom email address. You can choose whether or not to show personal and/or account links.
Image displays an image. You can choose the URL of the picture, alternative text that appears when your image won’t load, image title displayed when hovering over the image, caption to appear below, image alignment, width and height, and the link the image takes you to when you click on it.
Instagram displays your recent Instagram photos if Instagram is connected to your WordPress.
Internet Defense League allows you to show your support for the internet defense league. You can choose which campaign to participate in, how to promote the campaign (banner or overlay box), and choose the badge for the widget.
Links shows your blog roll. You can choose the link category, how to sort the links, what to show about the links (image, name, description, and link rating), and how many links to show.
MailChimp Subscriber Popup allows you to add a popup form for a subscription form. This requires you to enter a code provided by MailChimp. For more information on how to do this, follow this link.
Milestone displays a countdown. You can choose the event’s name, the date and time, and the message that appears once the countdown is over.
My Community displays some of your blog followers.
Pages shows a list of your web site Pages. You can choose how to sort them (title, order, or ID), and which pages to exclude (by listing the Page ID’s).
Posts I Like shows posts you recently liked through your WordPress account. You can choose how many posts to show, whether to display them as a list or grid, and which web page author’s likes that you want to display.
Recent Comments shows recent comments on your site. You can choose the Title, number of comments, avatar size, background color for avatar, background color for text, and where to show comments from (posts, pages, and/or media).
Recent Posts shows recent posts on your site. You can choose how many to show, and whether or not to show the post date.
RSS lets you show any RSS feed you want. You can enter its URL, choose how many items you want to display, and whether or not to show the item content, author, and/or date.
RSS Links shows links to your blog’s RSS feeds. You can choose which feeds to display (Posts, Comments, or both), and the format (text link, image link, or both).
Search adds a search form for your site.
Social Media Icons show icons for whatever social media sites you choose to link. You can list usernames for Facebook, Twitter, Instagram, Pinterest, LinkedIn, GitHub, YouTube, Vimeo, and Google+. You can do this for any social media sites, and it will appear as that site’s logo which functions as a link for the chosen user.
Tag Cloud shows tags you have used in your posts, with a larger size meaning more posts have that tag. Then, it takes you to a page with all posts with that tag. You can choose how many tags to include, and which tags to exclude, if any.
Text allows you to show any text you want. You can format it as text or as HTML. You can also choose to automatically add paragraphs.
Tlk.io Webchat lets you add a tlk.io chat channel. You can choose which channel to add, and the height of the web chat area. This is basically a message board embedded within your site.
Top Posts and Pages shows your most viewed posts and pages. You can choose the maximum number of posts to show (up to 10), how to order them (likes or views), and how to display it (text list, image list, or image grid).
Twitter Timeline displays Twitter’s official widget. You can choose the width and height, how many tweets shown, and the widget type (profile or ID). You must choose which Twitter username to display this for, and you can choose layout options (whether or not to include a header, footer, borders, and/or transparent background). You can also choose, in hex, the link and border colors. Finally, you can choose the timeline theme (light or dark). It also provides a link to show that user’s Twitter page.
Upcoming Events shows the upcoming events listed on an iCalendar. You can enter the iCalendar’s URL, and the number of items you wish to display.
Conclusion
So that’s all of the basics on how to start your own WordPress site! If you need any support, there is a free forum that any user can utilise at https://wordpress.org/support/. It has documentation, resources for getting started, and a variety of forums for different problems you may be having. In addition, any paid plan has email and live chat support with the WordPress website.